

How to Move Your Website from WordPress to Squarespace (Step-by-Step Guide)
So, you want to make the switch from Wordpress to Squarespace? This is a transition that can seem pretty daunting at first but, trust us, it’s actually a lot easier than you might think!
There are many reasons why you might be considering this switch. Maybe you are looking for a more all encompassing platform, want to purchase one of our Premium Squarespace Templates, or are just in need of a change and have heard great things about Squarespace (we could list at least a hundred). Whatever the reason, we see it all the time so you’re not alone.
That’s why we wanted to create this easy to follow step-by-step guide to show you how doable this transition is, and how you can quite literally make the switch in a matter of hours.
Let’s dive in!
What can be Transferred From Wordpress to Squarespace?
The most important thing to note before we dive into the “how-to” is that Wordpress and Squarespace are, by nature, completely different platforms. This means that you won’t be able to transfer over everything from your Wordpress site and expect it to look and function exactly the same in Squarespace!
The main goal of this transfer is to move over your website content. This includes:
Site Pages including Copy (text) and Individual Images
Blog Posts
Blog Categories
Blog Comments
It’s not possible to bring over your Wordpress site’s theme design including colors and fonts. Some other things that cannot be transferred over include:
Plugins
Gallery Images (aka a collection of images - only individual images will be exported)
Image Captions
Custom CSS
The good thing is that (in most cases) when you’re making the move over to Squarespace it usually means that you’re planning to create a new, or at least “refreshed”, design for your website! So starting over with design and styling shouldn’t be a massive issue for you.
However, if you would like for your website to look exactly the same after transfer, we would recommend hiring a Squarespace designer to help you out as it might be a bit tricky to recreate the same layouts and style choices.
Important! Make sure that you familiarize yourself with Squarespace before you decide to transfer! Because these are two completely different platforms, the capabilities that you currently have on your Wordpress site might not be available in Squarespace. For example, Squarespace isn’t compatible with Wordpress plugins or widgets, so you’ll have to find a Squarespace based solution for these features. There are also differences between the platforms when it comes to pricing, design, scalability, security, support, and more.
For some more in-depth information and a comparison of both platforms, check out our Squarespace vs Wordpress guide!
👉 Why We Recommend Squarespace for Small Business Owners
👉 5 Features you can add to ANY Squarespace Site
Alright, now that you’re aware of what can and cannot be transferred, let’s get into the nitty gritty of making the switch!
Step One: Sign up for Squarespace and Choose a Template to get Started
Naturally, your first step should be to create your new Squarespace account. Squarespace offers a 2 week free trial and you can make the transition from Wordpress during the trial period.
Head to Squarespace.com to sign up!
Free Squarespace Templates
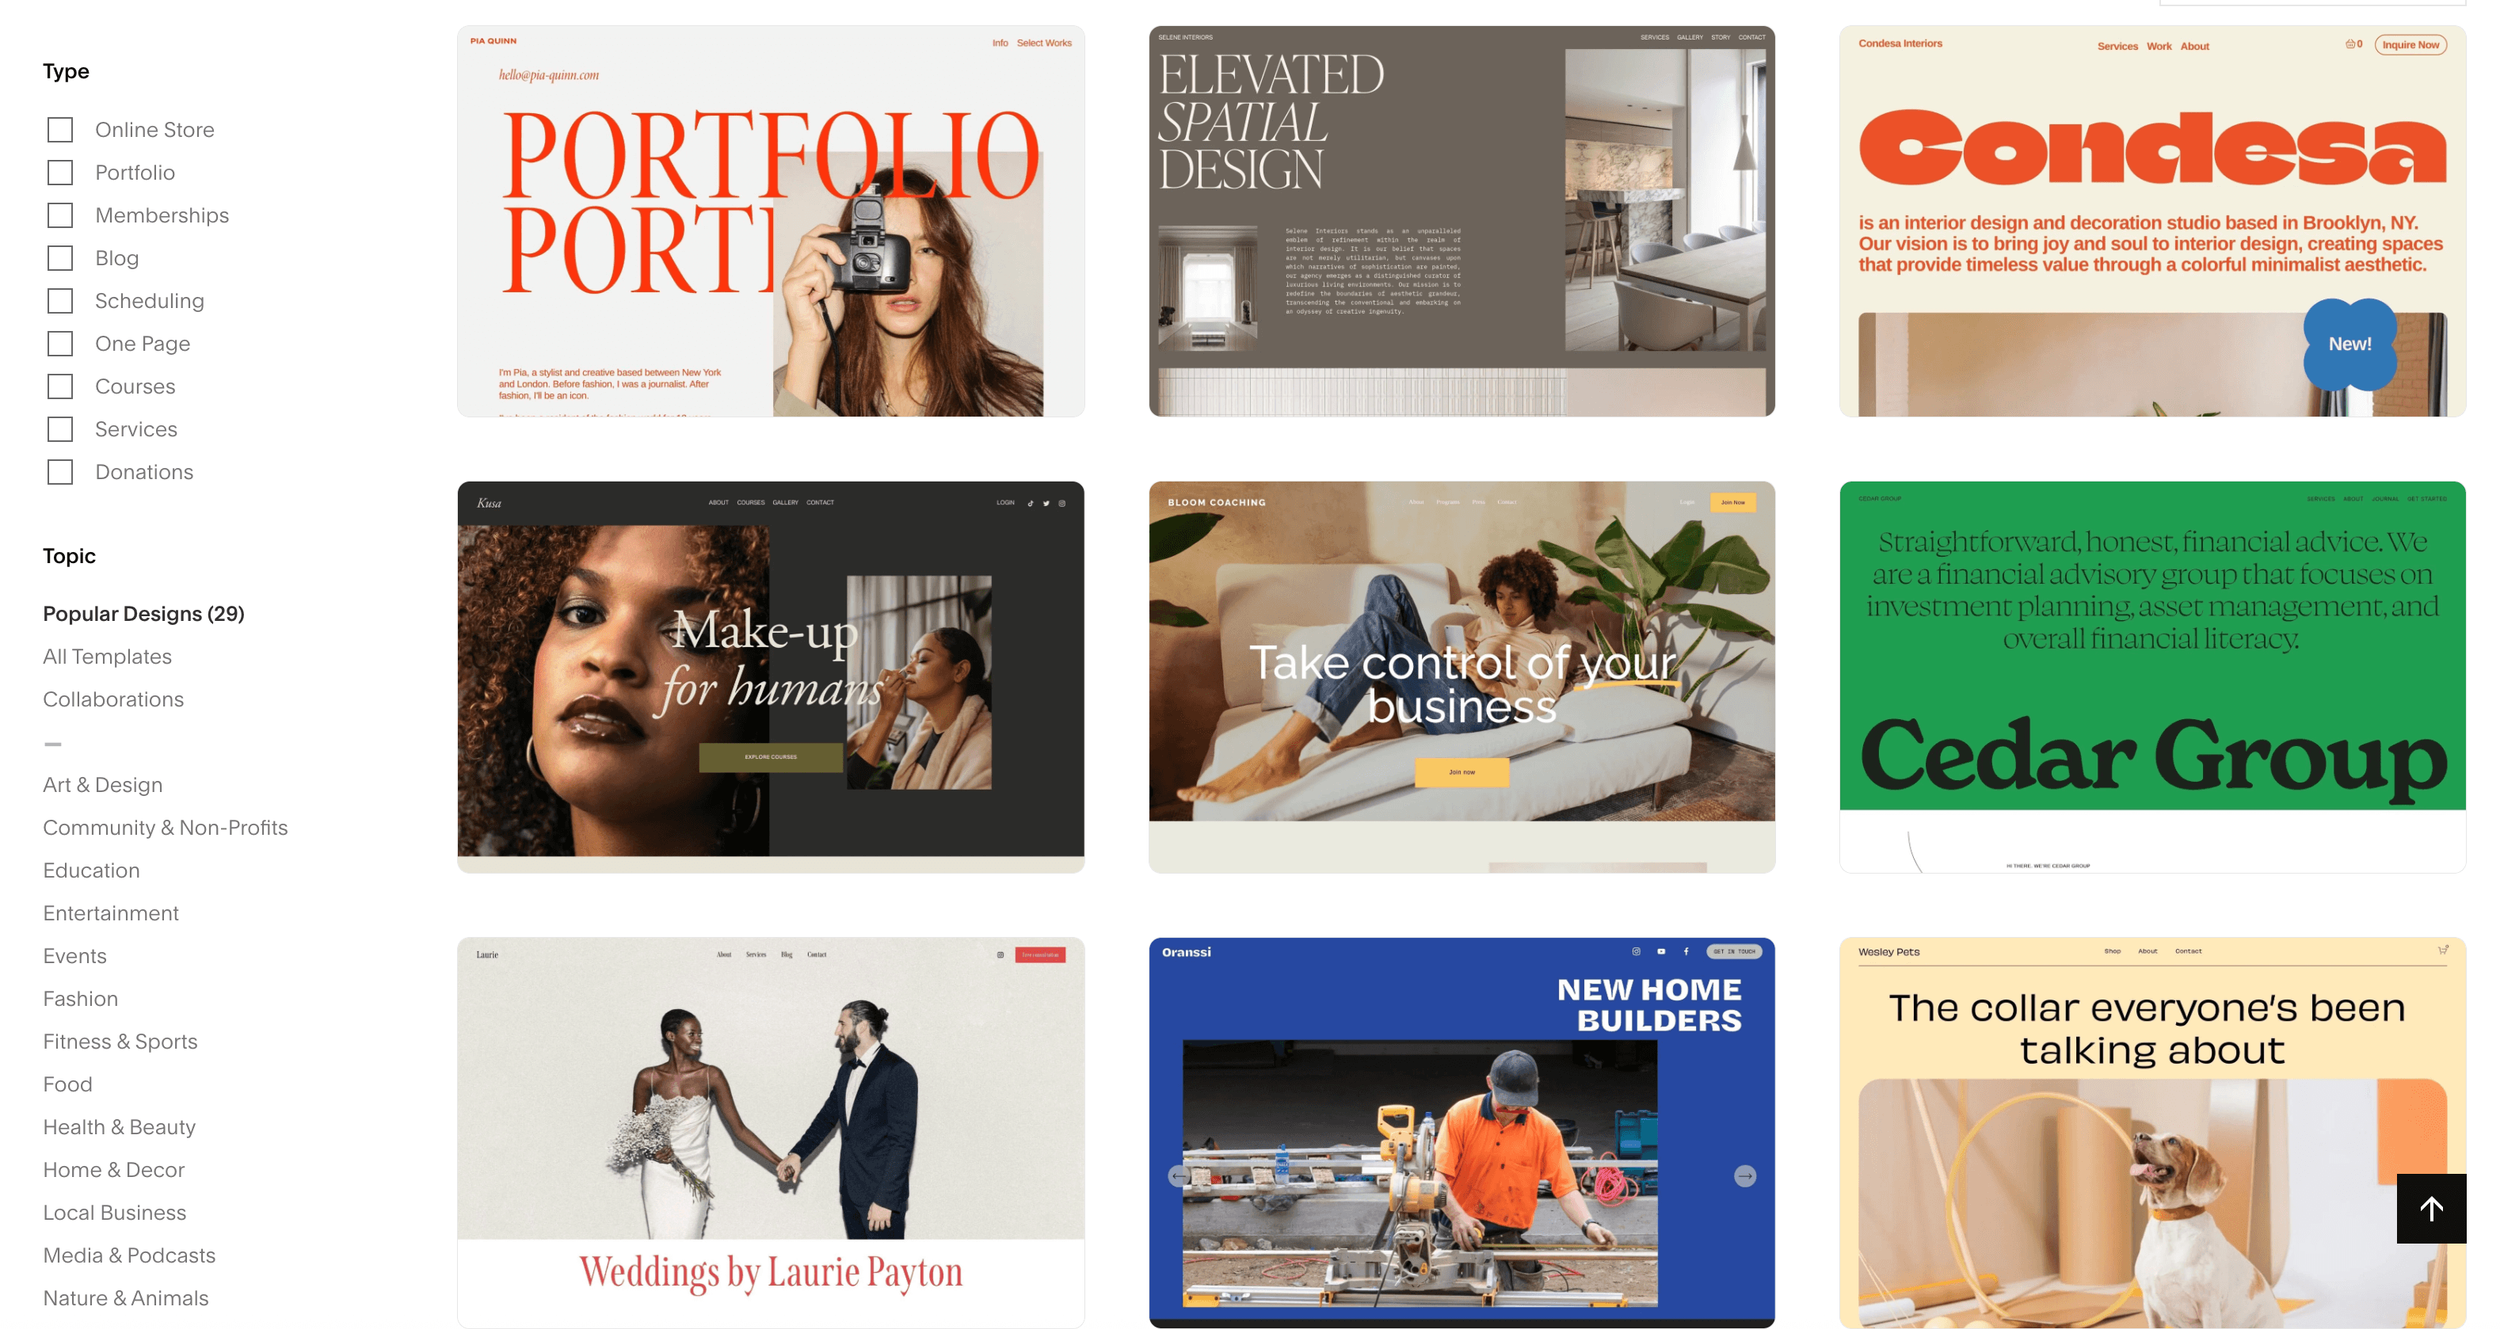
When you first create your Squarespace account, you’ll be prompted to choose from one of their free templates to get you started.
Now, this might seem a bit overwhelming at first because there are SO many to choose from, but the cool thing about the Squarespace version 7.1 templates is that they all have the same exact features and are all completely customizable, so it doesn’t even really matter which one you choose to start with.
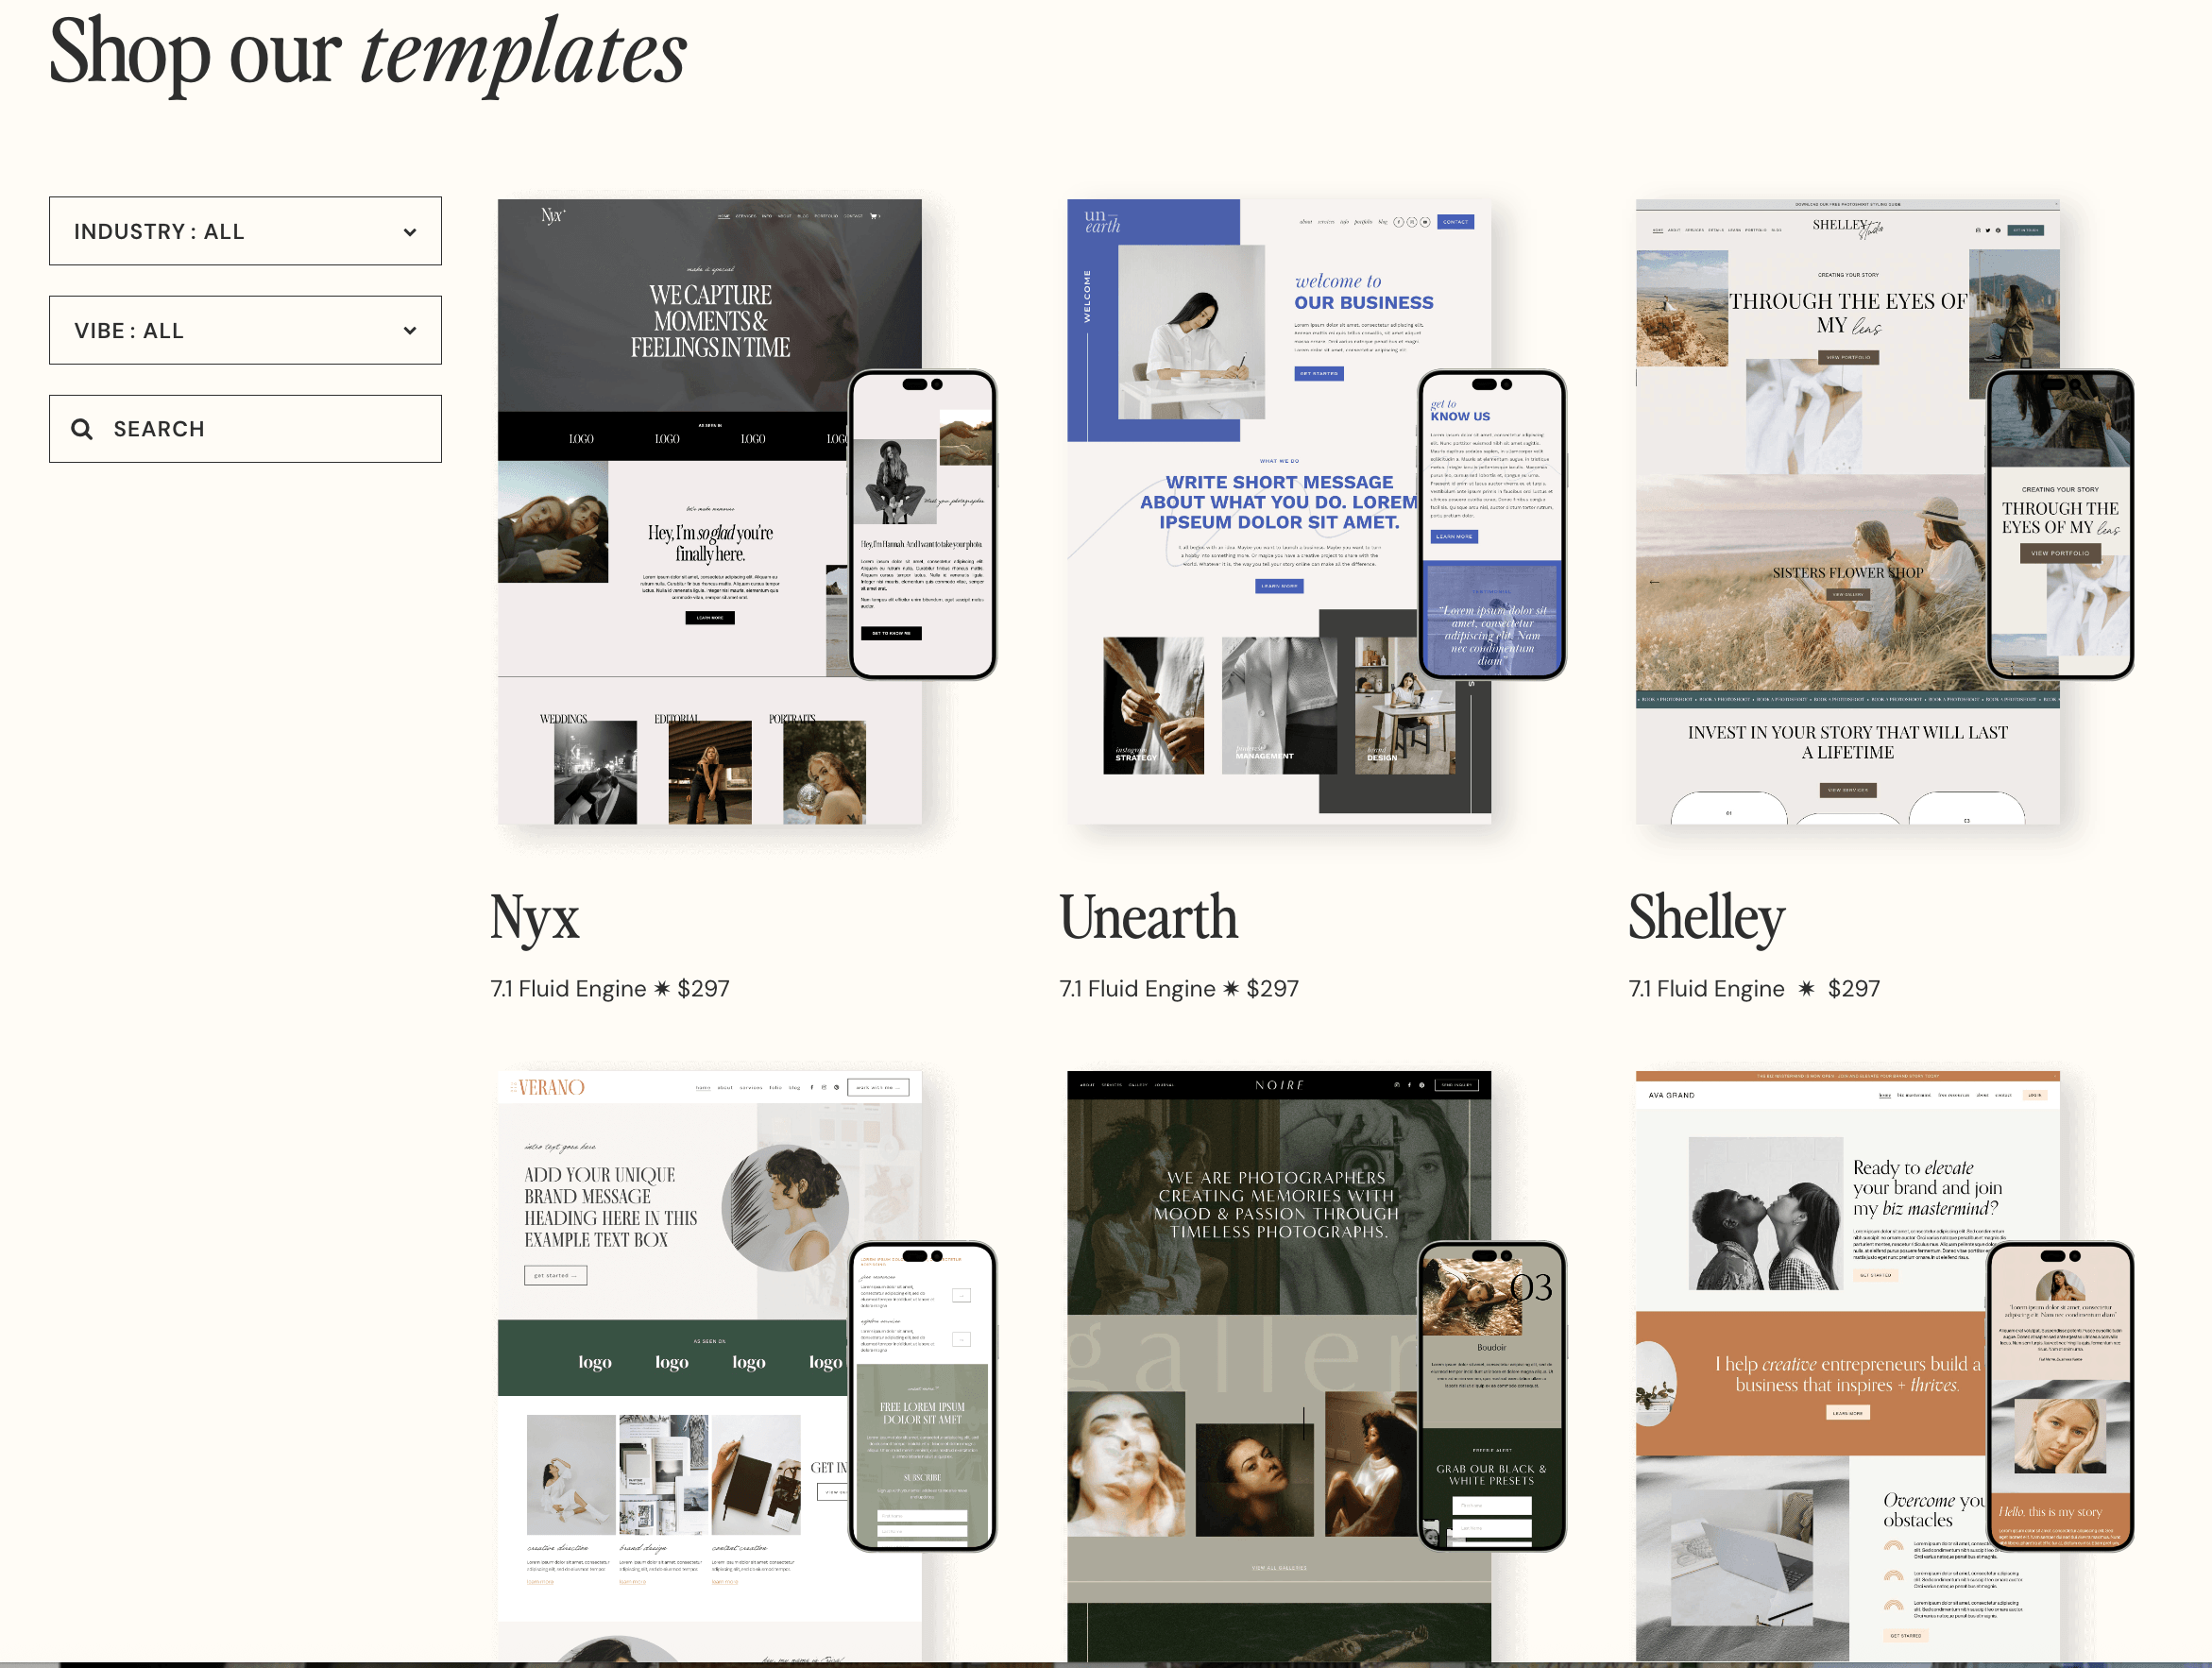
Premium Squarespace Templates
The other option you have is to instead purchase a pre-designed template like our Premium Squarespace Templates to start your new website with!
If you are planning on refreshing the design of your website after switching over to Squarespace, then this is a really great way to get you a beautiful and functional site that you feel proud of, without spending thousands of dollars on custom design. This is, after all, exactly what our templates are created for.
They’re easy to customize and so simple to get started with. Once you choose and purchase a template, it’s delivered directly into your Squarespace account so that you can start making it your own right away. This drastically speeds up your set-up time and eliminates the need for you to pick a free template and figure out how to start from scratch.
Something that you might find super helpful if you're coming from Wordpress and don't have much experience with Squarespace is that our templates comes with a full library of resources and tutorials covering how to set up your new template, use the Squarespace editor, and launch your website, so if you’re nervous about starting in a brand new platform or just want some extra design guidance, you’ll be all set!
Our Premium Squarespace Templates come in all different styles, so you’re sure to find something that suits your fancy, and they each come with matching add-on pages like a Sales Page, Instagram Links page, Shop page, and more to fully round out your site design. You’re truly covered with these templates and they’ll definitely make the transition from Wordpress to Squarespace feel even more seamless.
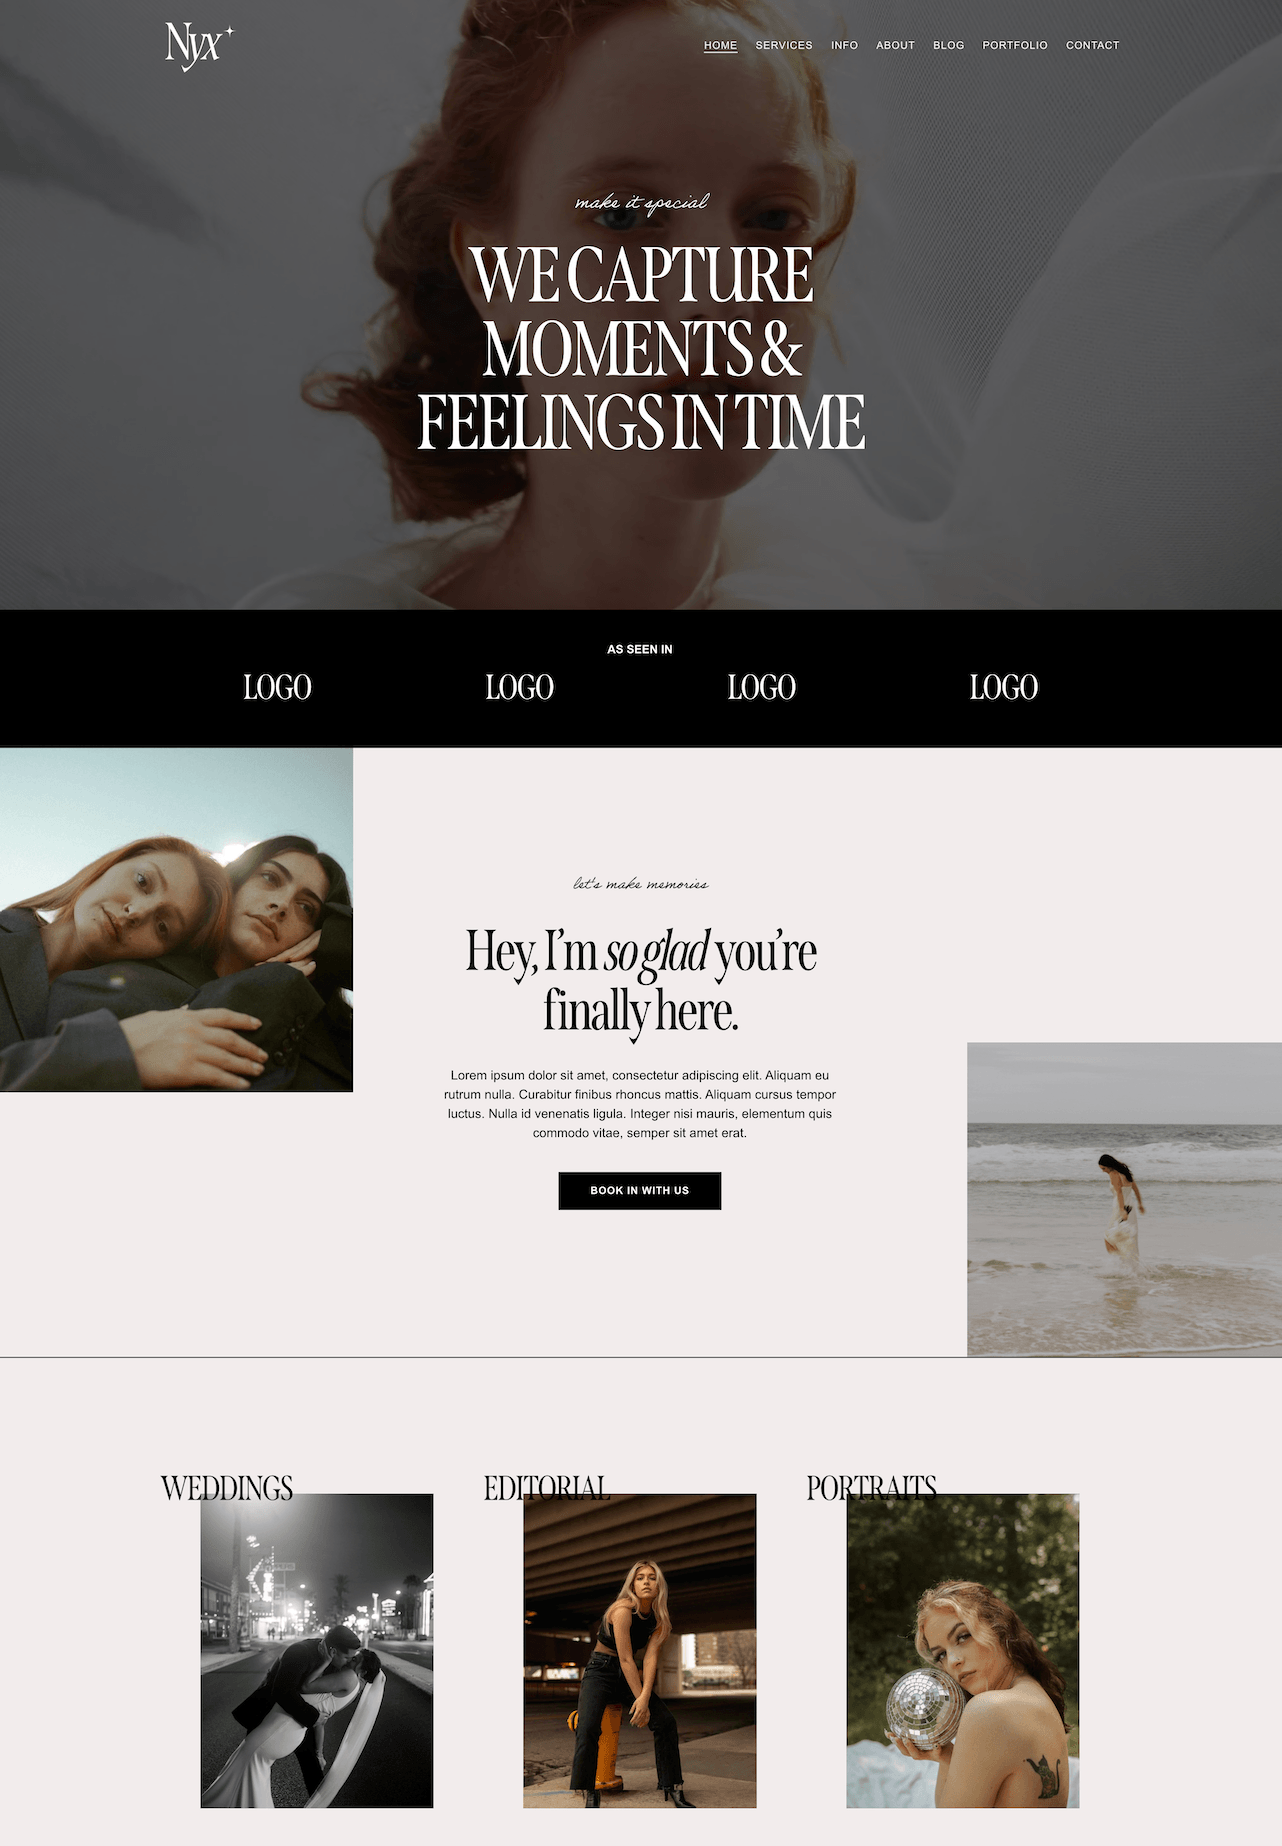
Homepage of our Nyx Premium Squarespace Template

Shop Page Add-On From our Nova Premium Squarespace Template
Step Two: Export from Wordpress, Import to Squarespace
How to Export Your Content From Wordpress
In order to transfer your content, you'll first need to export everything from Wordpress. Then you can go ahead and import it all into Squarespace.
To do this, login to your Wordpress site and in your My Home dashboard sidebar menu click Tools and then Export.
Under "Choose What to Export" select All Content to export everything from your website OR select specific types of content if you only want to export certain things. You can then click the Download Export File button to export all of your content as a .xml file to your computer.
How to Import Your Content to Squarespace
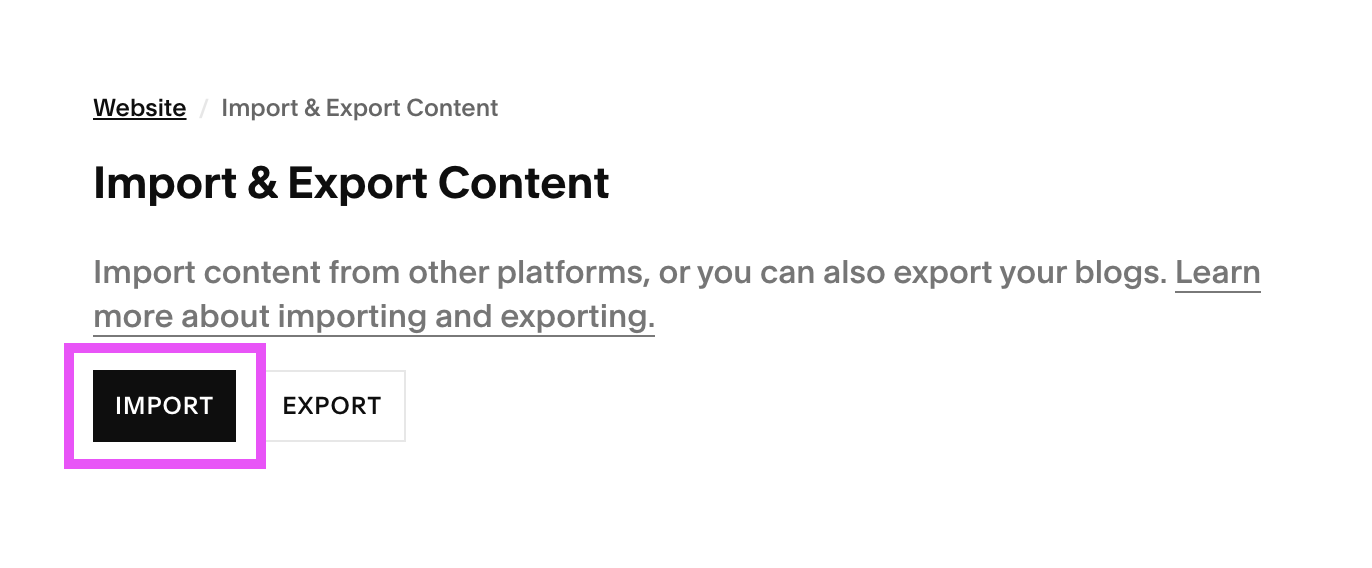
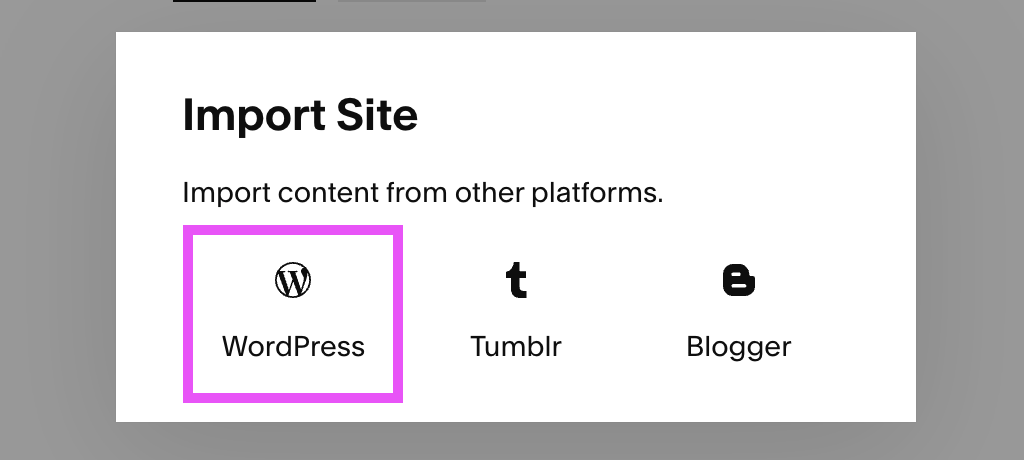
Once you’ve done this, head back into your Squarespace website and navigate to the Import/Export Panel by clicking the slash key ( / ) on your keyboard and typing in Import & Export Content.
From here, click on Import and then Wordpress.
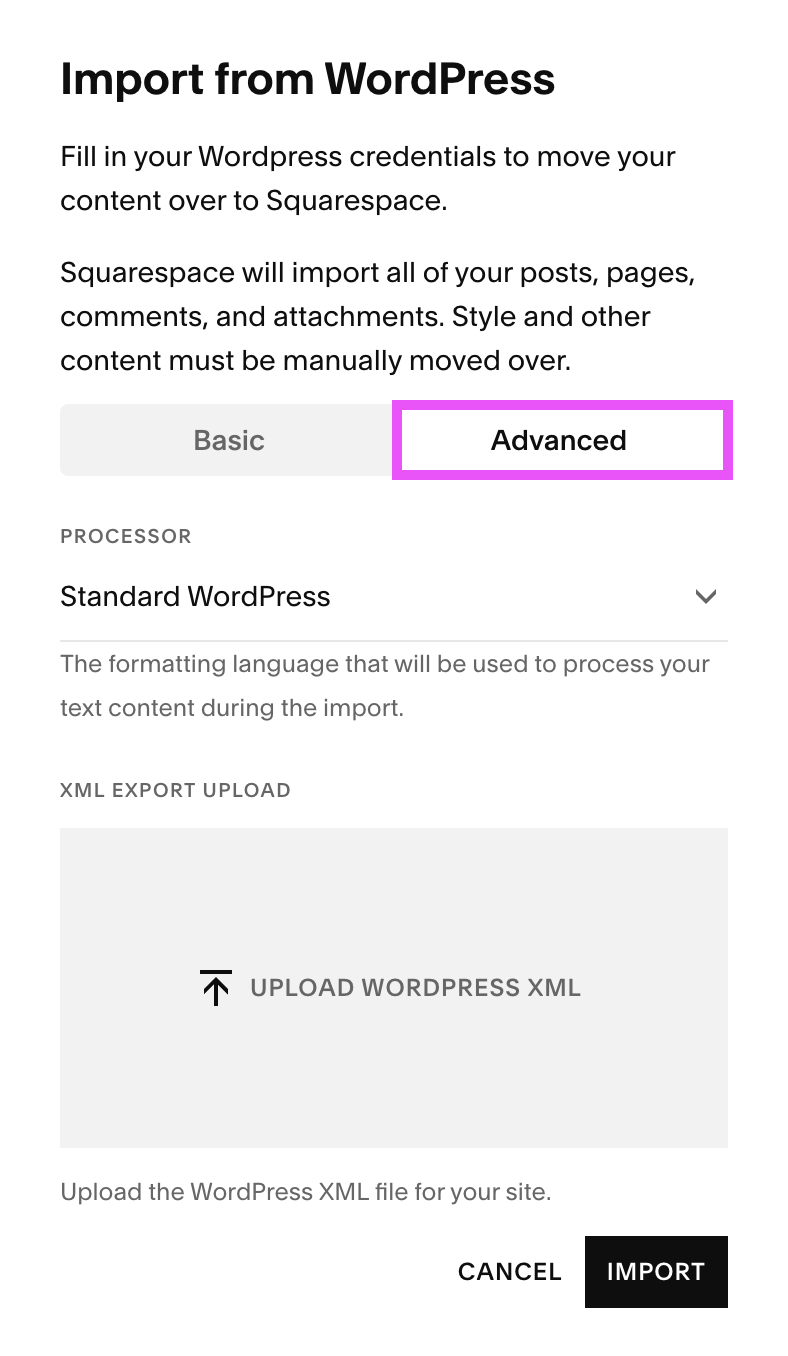
In the “Import from Wordpress” window that pops up, choose Advanced.
If you used Textile or Markdown markup language in your Wordpress content, you can use the “Processor” dropdown menu to choose one of those options. Otherwise, leave it as Standard Wordpress.
Next, click in the Upload Wordpress XML field to choose your .xml file from your computer, or simply drag it into the box. Finally, click Import.
After you’ve clicked Import, a progress bar will appear to show that your content is, in fact, importing! The amount of time this takes will depend on the size of your original Wordpress website.
When all of your content is finished importing, a “Success” message will appear and you’ll be able to find all of your page content in the Not Linked section of your Pages panel (refresh your site a couple of times if you don’t see it right away).
There is also a "Basic" import option that you can explore if you have a very simple Wordpress website without a ton of content, however Squarespace recommends using the "Advanced" option (that we just discussed) for most Wordpress sites as it's the most comprehensive.
Step Three: Adjust and Enable Your Imported Pages
Like we mentioned above, when your Wordpress content gets transferred over, the pages automatically get put in the Not Linked section of your Pages panel. This is where pages go when they’re not linked directly to any menu on your website, so they’re not immediately accessible to visitors.
Check + Tweak Your Page Designs
If you aren't using a pre-designed template and just want to keep your new Squarespace website looking as similar as possible to the old Wordpress site, then it's important to check the imported pages to make sure all of your content was transferred properly and that you're happy with how the pages look.
To access your Not Linked section, navigate to your Pages panel (Website > Pages) and scroll down to the Not Linked section.
From here you can click on any of your imported pages to see what they look like and make any adjustments necessary to the layout and design (view some resources below for customizing the pages on your Squarespace website!).
This might be the most time consuming step of the whole transfer. Building in Squarespace is a lot different than building in Wordpress, so you might have to learn how to design pages from scratch. Once you get the hang of it though, it will become second nature!
Here are some more resources:
👉 How to Edit in Squarespace 7.1 with Fluid Engine
👉 6 Tips for Designing & Optimizing Your Homepage for Better Results
👉 Mobile Optimization: Creating Responsive Squarespace Sites
Tip! All of the info you might need to customize the design of your pages is covered in the resources library if you purchase one of our Premium Squarespace Templates. We'll walk you through it all via video tutorials and helpful guides.
Enable Your Pages
Once you are happy with the design of your pages, you’ll also need to enable them, as they’ll have been turned to disabled during the transfer (this means that they’re not live on your site yet.)
When you’re ready to enable a page, hover over the page name and click on the cog icon.

In the Settings window that pops up, click on General and scroll to the bottom. Next to where it says Enable Page, turn the toggle ON.
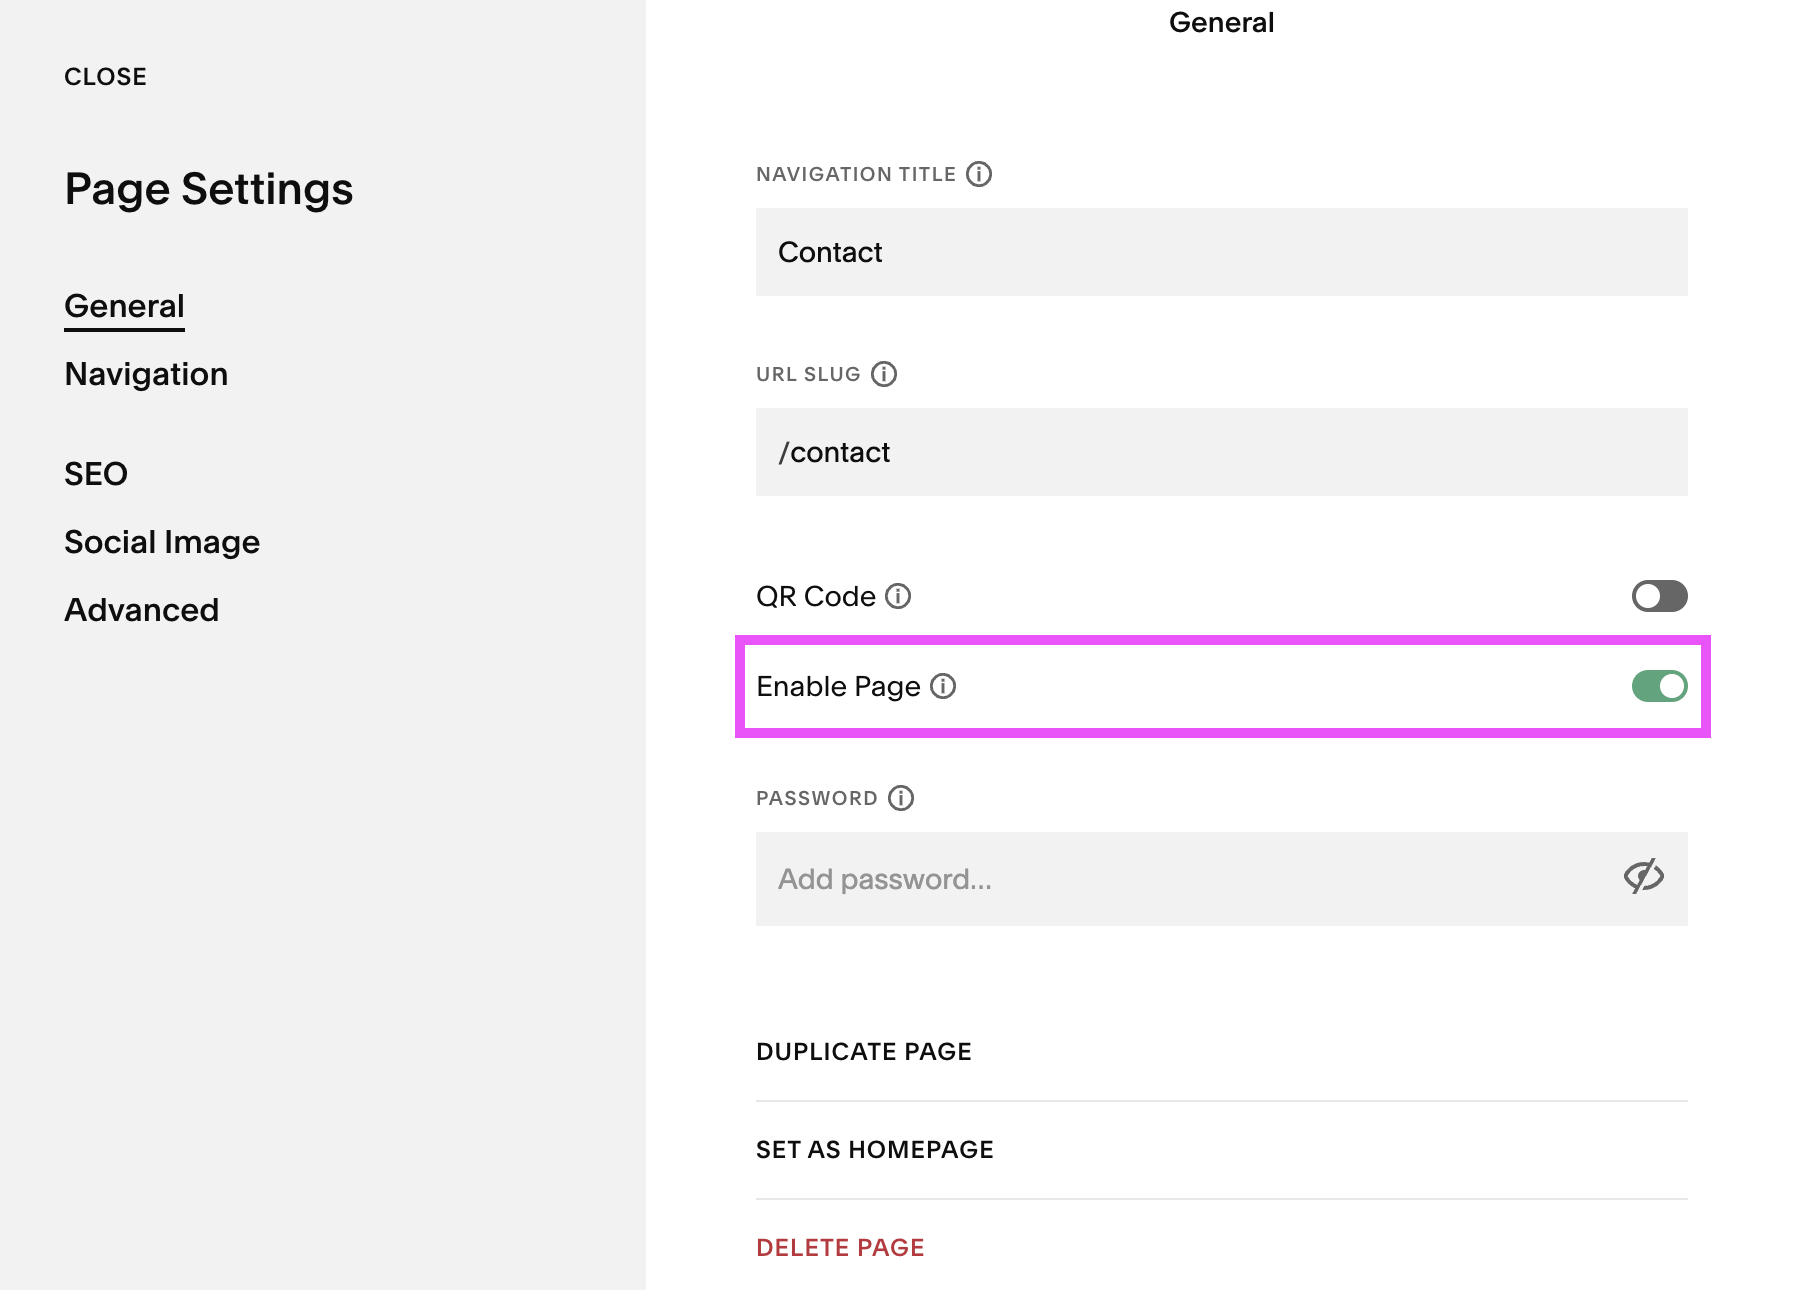
That page will then be officially active on your Squarespace website.
Organise Your Pages and Navigation Menu
If you’d like to also make the page available in your Main Menu, simply click and drag the page name in your Pages panel and move it from Not Linked to under the Main Navigation section, and you’re all set!
Step Four: Organise Your Blog Posts
Sometimes when you transfer your blog posts from Wordpress to Squarespace, they can come in separated into different blogs, and this is probably because Squarespace is translating any Wordpress blog categories into separate blogs.
Generally, if you’re blogging with Squarespace, we recommend having one main blog, so you can see how this issue might be a little annoying.
Don’t worry though, there’s a pretty easy fix!
We recommend that you go ahead and create one main blog, and this is going to be your bread and butter blog page where visitors will go when they want to read all of your blog content. You can then move all imported blog posts into that main blog and separate them into categories for organization.
To do this, first create your main blog, and then head back into your Pages panel and navigate to one of the imported Wordpress blogs.
Click into the blog and the Blog Panel will open up showing each of the blog posts that have been separated into that blog. It should look something like this:
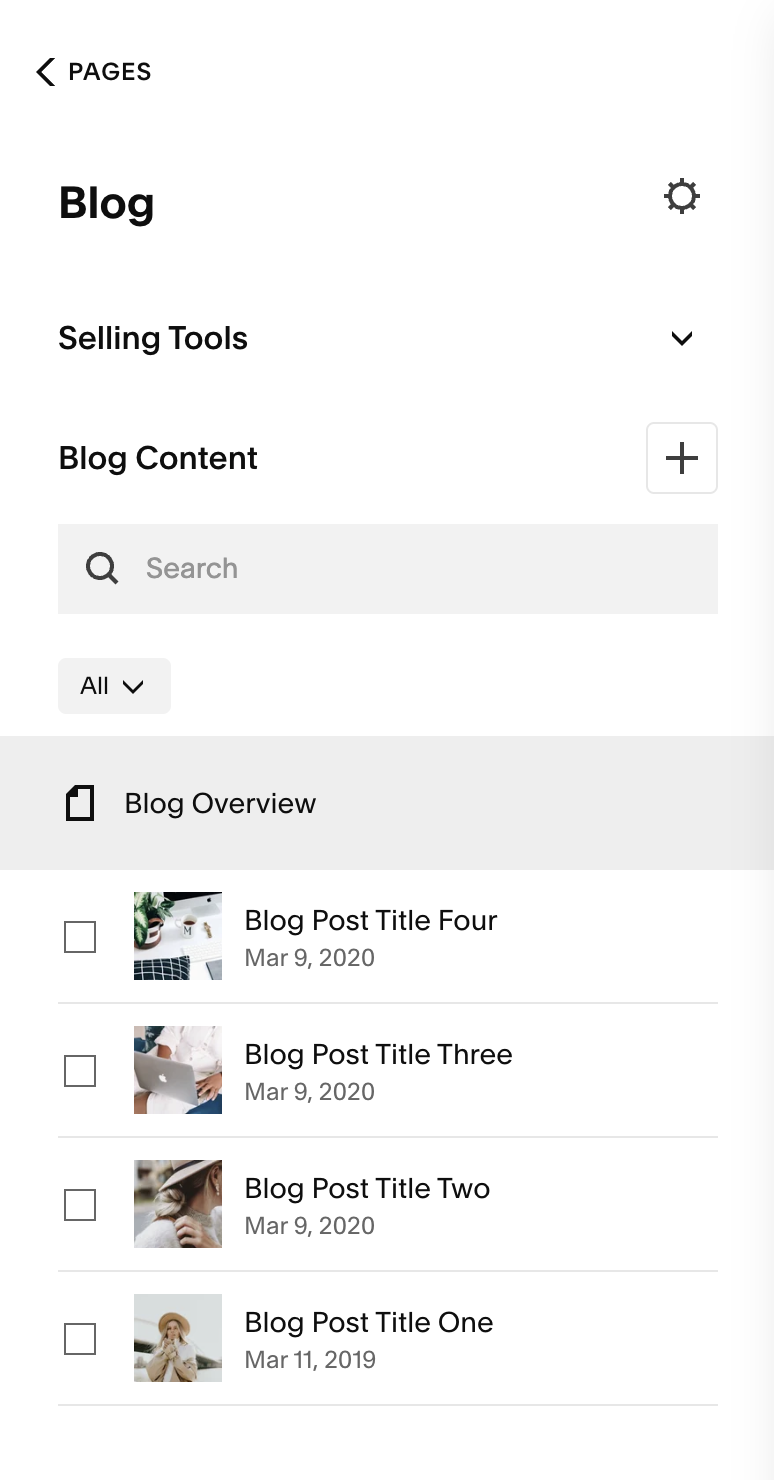
You can then click the checkbox next to any posts you want to move or choose the Select All option that will appear at the bottom of the panel to select all of the blog posts at once.
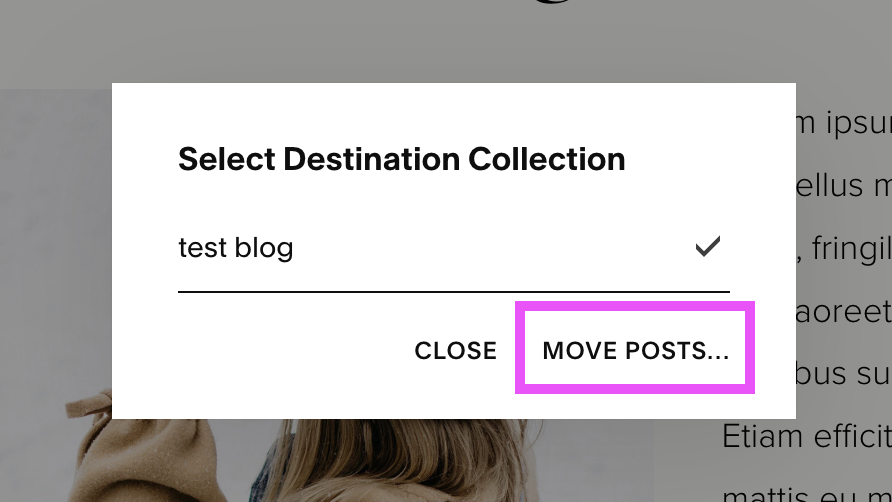
Once you’ve selected all of your blog posts, click the Move button at the bottom of the panel, select your new main blog from the destination window that pops up and then click Move Posts.
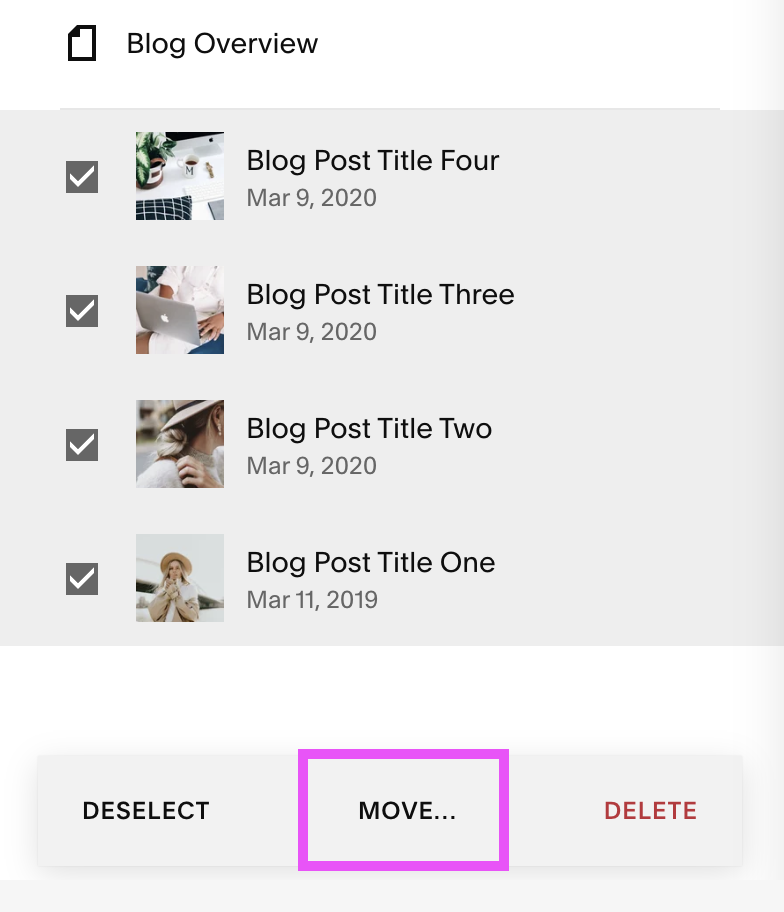
You can do this with any individual blogs that were created during the transfer and then delete those old blogs when you’re done. And once you’ve moved all of your blog posts into your new main blog, you can create new categories to separate and organize all of your blog posts!
👉 How to Start a Blog with Squarespace
👉 How to Link Your Blog Categories on Your Squarespace Website
Step Five: Check and Map Your URLs
If you already had a somewhat established website on Wordpress, then it’s likely that people will have links of yours saved, or that some of your older links will be displayed on search engines like Google or Pinterest.
In this case, you need to make sure that if someone were to click on one of those old links, that they’re going to end up on the correct post or page that’s now on your new website!
For example, if your old Wordpress blog post URLs looked like this:
www.yourwebsite.com/blog-post-name
And your new Squarespace blog post URLs look like this:
www.yourwebsite.com/blog/blog-post-name
Then if someone tries to visit an old Wordpress post, they’ll be met with a “Page Not Found” message instead of the blog post they intended to read. Eek!
👉 How & Why you Should Create a Custom “404 Not Found” Page in Squarespace
The best thing to do here is to first check that all of your regular pages in Squarespace have the same URL as before. You can edit the URL slug for pages by clicking on the cog icon next to a page name and navigating to the URL Slug field in the Settings window that pops up.
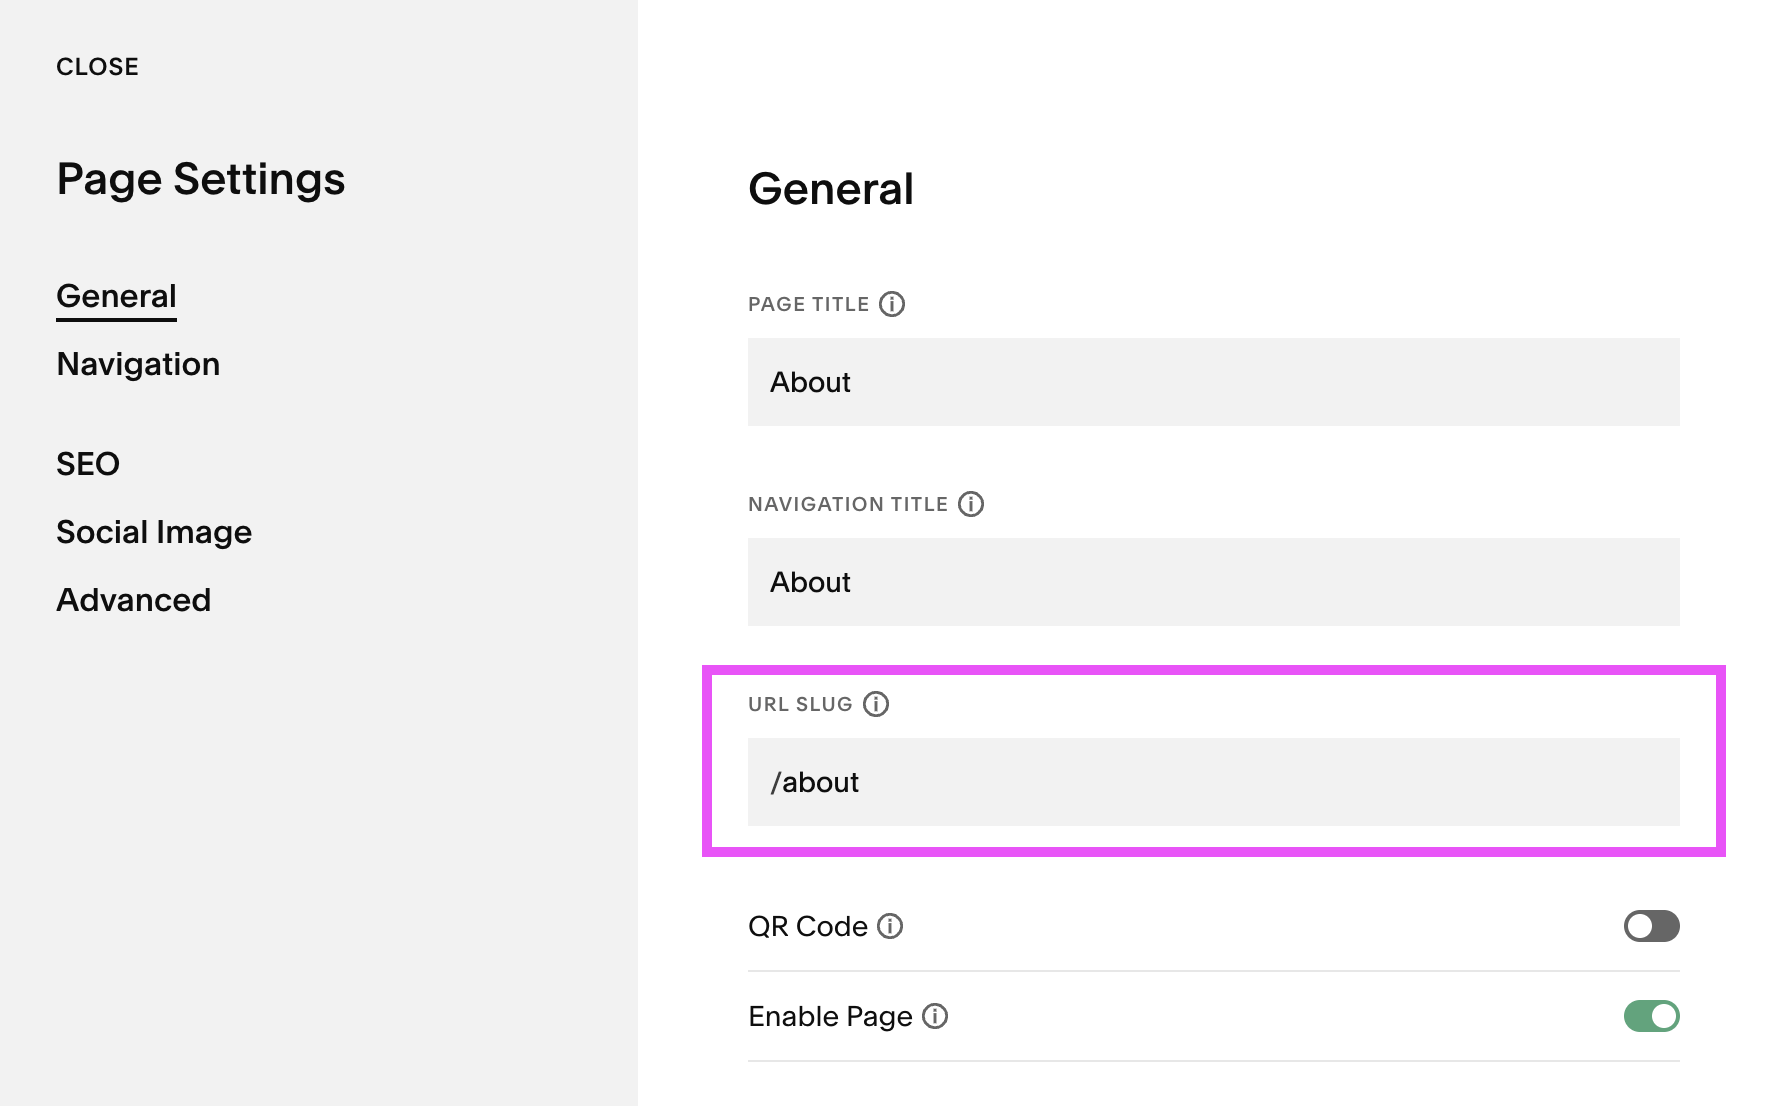
These should all be the same as they were on your Wordpress site, but it’s still worth checking them just to be safe.
Next, you might consider creating some URL Redirects for content like blog posts, which will forward people away from a page that no longer exists to one that’s active.
This can be a little tricky to get the hang of, but to get started, navigate to the URL Mappings panel in your Settings by clicking the slash key ( / ) on your keyboard and typing in “URL Mappings”.
In the URL Mappings text box, you’ll want to add your redirects in the following format:
/old-url -> /new-url 301
For example:
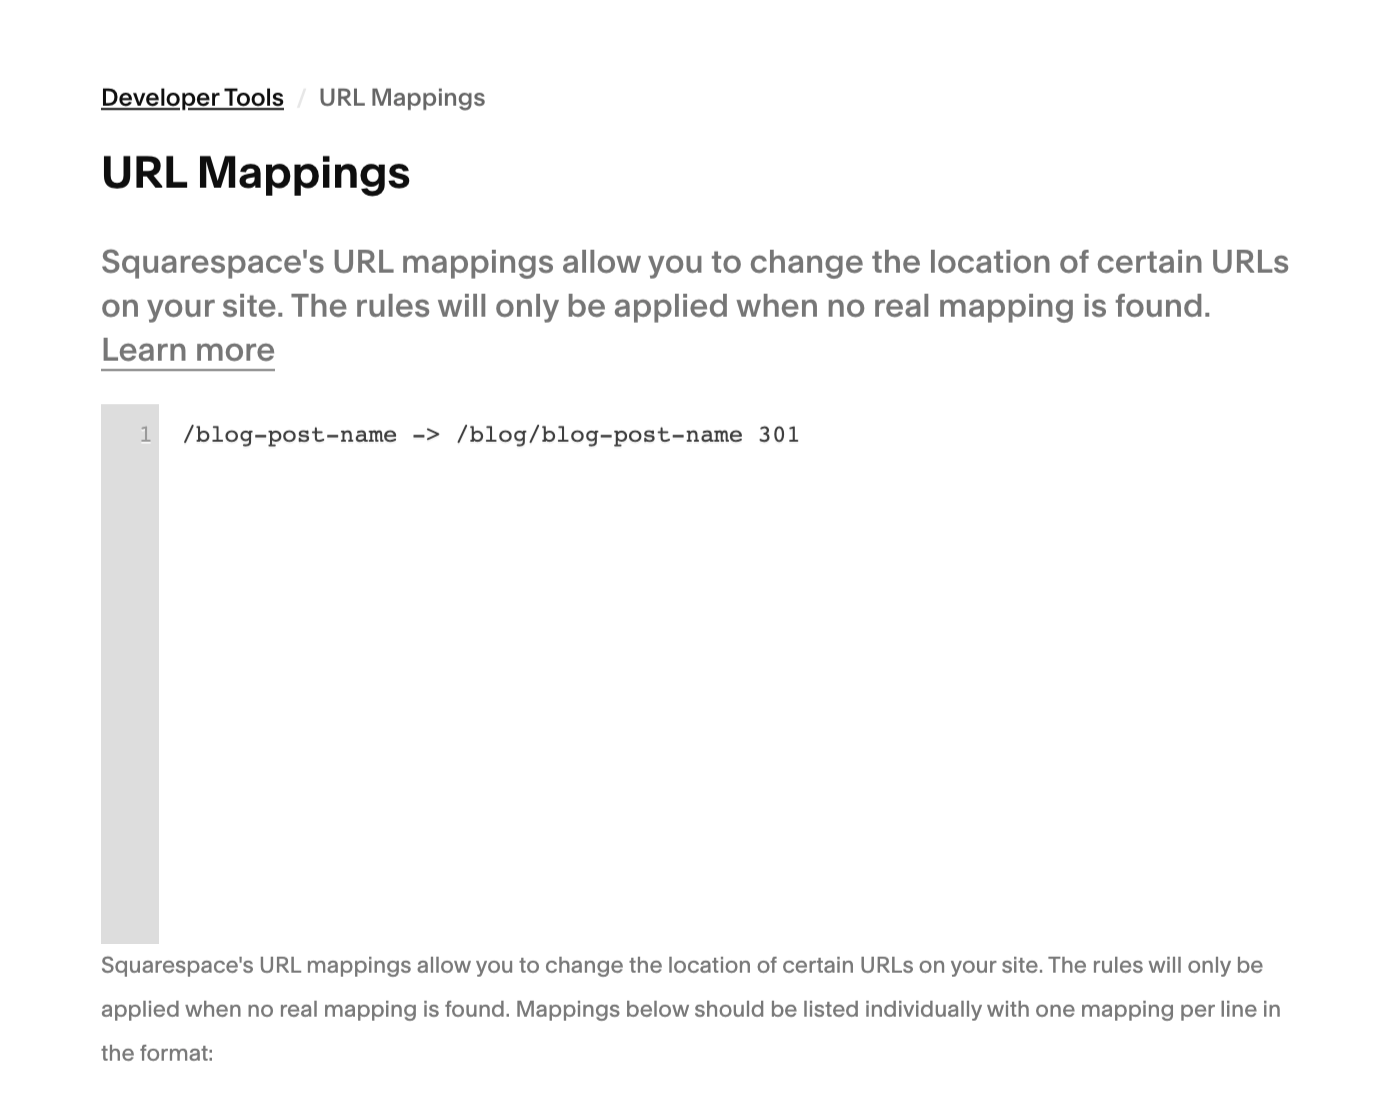
As you can see, the first part of the mapping is the old URL and the second part is going to be your new URL. This makes it so that when anyone visits the old URL, they’ll be automatically redirected to the correct page (aka the new page on your new Squarespace site).
These redirects won't officially function until your domain is connected (which we'll go over next!), but since they are so important, it's worth getting them added ASAP. Then, once your domain is set, you can check your work by visiting all old URLs to see if you're correctly redirected.
You can add as many redirects as you’d like to the URL Mappings text box, so be sure to cover all blog posts and individual pages necessary.
And if you need a bit more guidance with this process, we have an in-depth blog post talking about why URL redirects are so important and how to create them in Squarespace that you can check out!
Step Six: Complete Settings and Final Launch Checklist
Now that you have all of your content imported, and you've finalized your site design, you'll want to take care of some final Squarespace settings and make sure that your site is fully set to be launched.
If you've purchased one of our Squarespace Templates, we'll provide you with a full library of tutorials that walk you through exactly how to set up your site (told you, super convenient!).
If you're not using one of our templates, some of the most important things to keep an eye out for are:
Business Information: Name, Phone Number, Address - specifically important if you have a physical location
SEO Settings: Site Title, SEO Descriptions, Alt Text, etc.
Image Optimization: Image names and size
Adding your Logo, Social Logo and Favicon
Updating your 404 Not Found Page
And more! To help you out, we have created the Ultimate Website Pre-Launch Checklist which you can go through before launching. This will ensure that all ends are tied and your site is ready for ultimate success.
Squarespace also has a huge library of "getting started" resources that might be really helpful if you've never used the platform before. These tutorials cover everything from site and business information settings to editing to publishing. Check out that library here.
Step Seven: Upgrade Your Squarespace Plan
When you’re finished transferring all of your content and are happy with the design of your new Squarespace website, it’s time to think about making your website live!
In order to do this, you’ll need to upgrade your Squarespace plan from the free trial to a paid subscription. To accomplish this, all you need to do is click the slash key ( / ) on your keyboard and type in Billing to be taken directly to the Billing Panel.
From here, click into the Subscriptions tab and then click on your website under “Trial Subscriptions”.
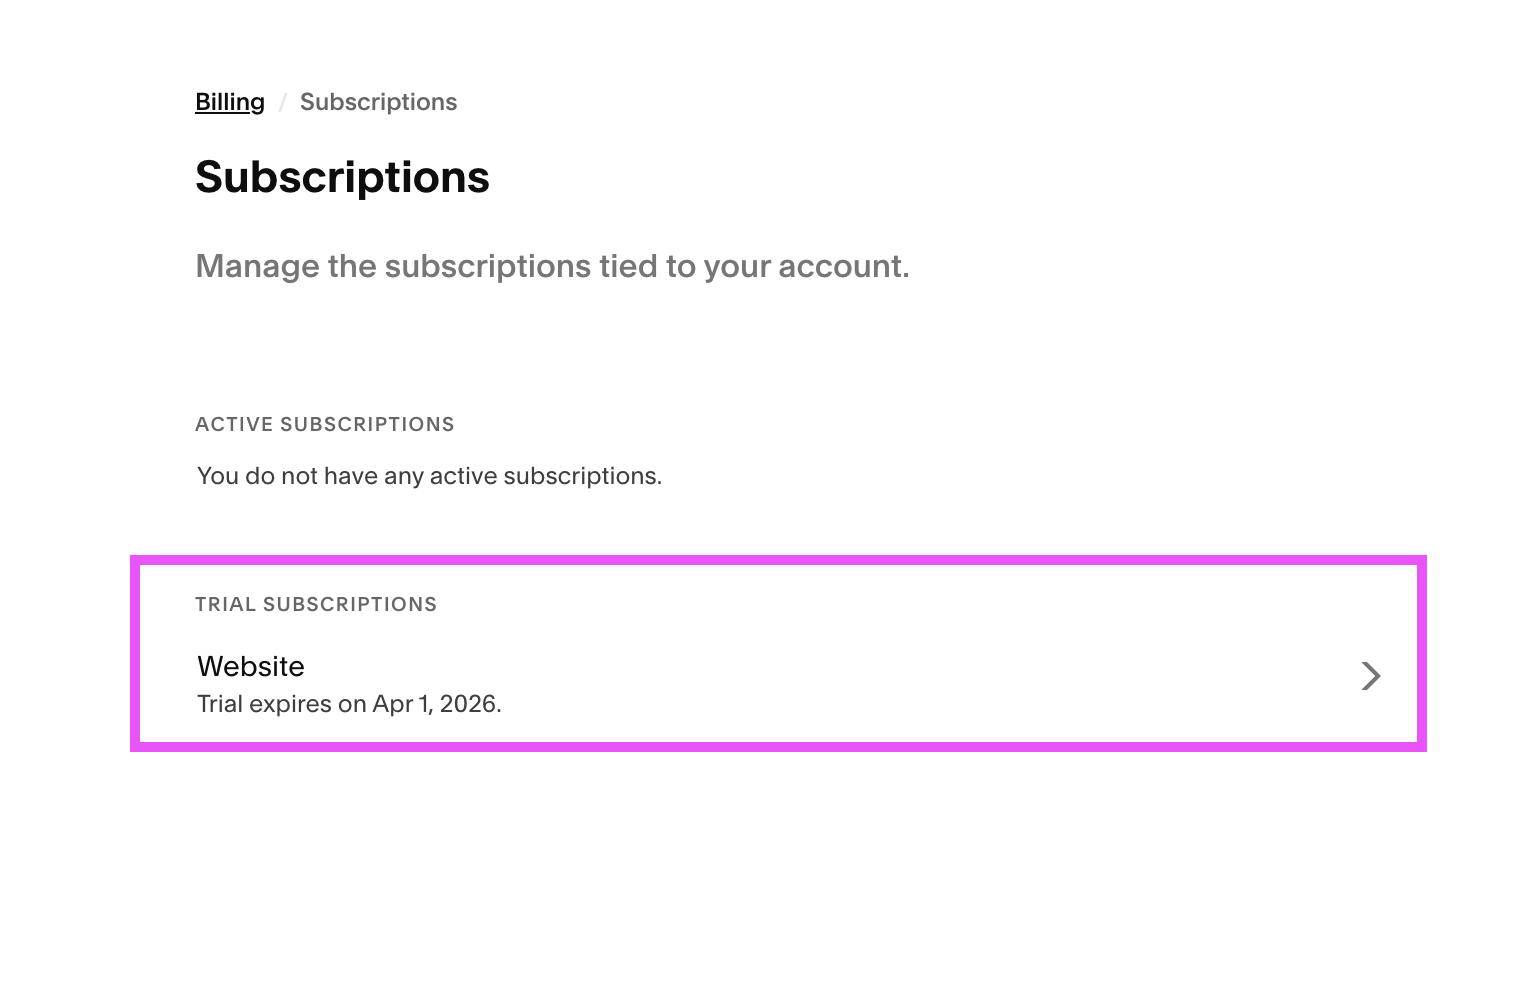
From here you can click on Subscribe and choose a plan (see Squarespace's up to date pricing here.)
Alternatively, you might see a blue Subscribe button at the bottom of your website while you’re in the back-end. You can click this button and choose a plan that way as well.

Tip! All of our Premium Squarespace Templates are delivered as a new site with a 12 months free trial (instead of the standard 2 weeks trial) which gives you plenty of time to work on your site without having to pay. Once you're ready to go live (or once the free trial expires, whichever comes first), you'll also get 25% off the first year of your annual Squarespace subscriptions on your new site! Pretty handy right! ✨
👉 If you're not using one of our templates, you can also get 10% off your next Squarespace subscription with discount code BIGCATCREATIVE10
Step Eight: Connect Your Domain
If you're transferring your website from Wordpress, odds are that you already have a domain name that you’d like to keep!
The good news is that you can easily keep your domain and connect it to Squarespace with just a few clicks. To do this, click the slash key ( / ) on your keyboard and type in Domains to be taken directly to the Domains panel.
From here, click on the Use a Domain I Own button.
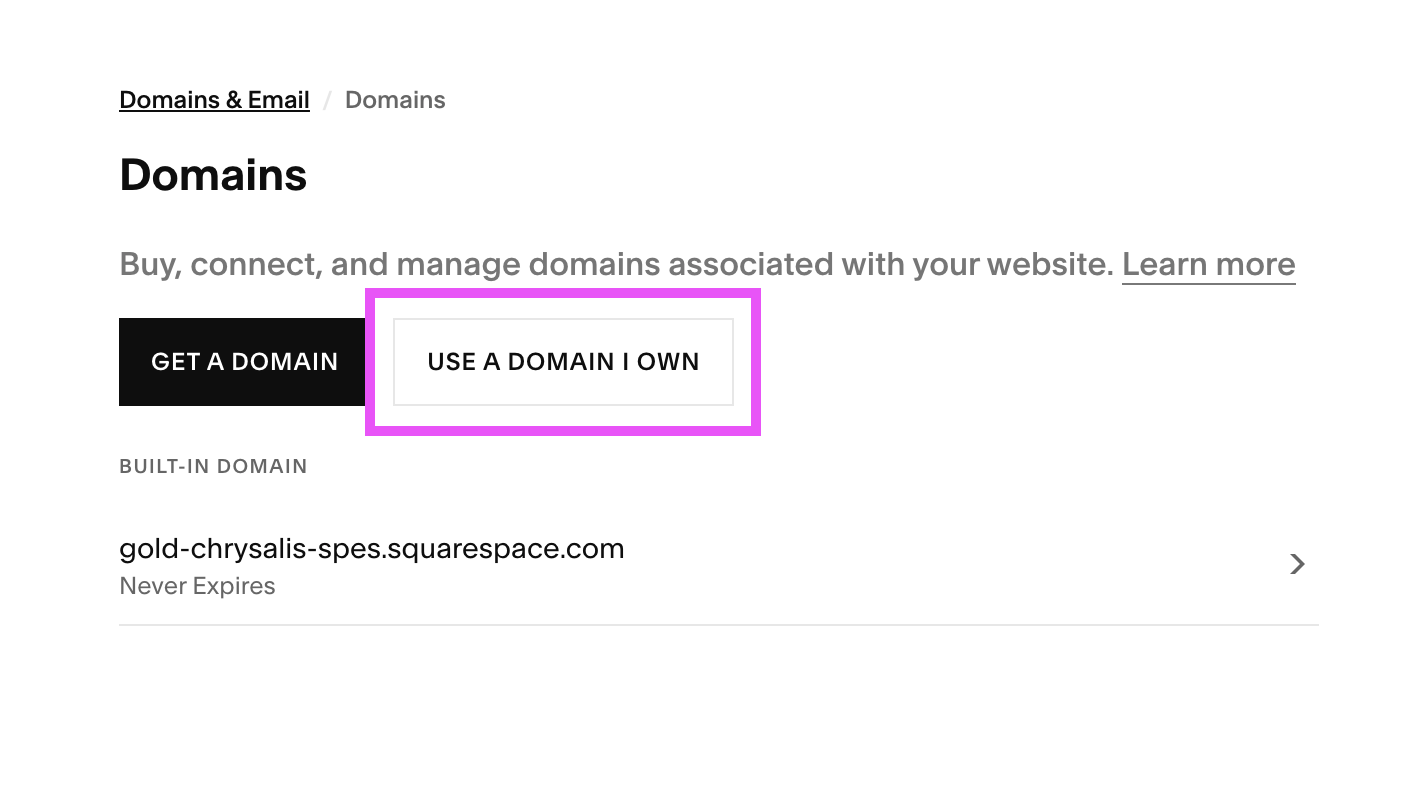
You’ll then have two different options for connecting your domain:
Transfer Domain: With this option, you’ll fully move your domain from the third-party provider you purchased it with to Squarespace so that you’ll be able to manage all of your domain billing and settings directly from your Squarespace account.
Connect Domain: With this option, your domain will become connected to your Squarespace website but still be managed by the third-party provider from which you purchased it from.
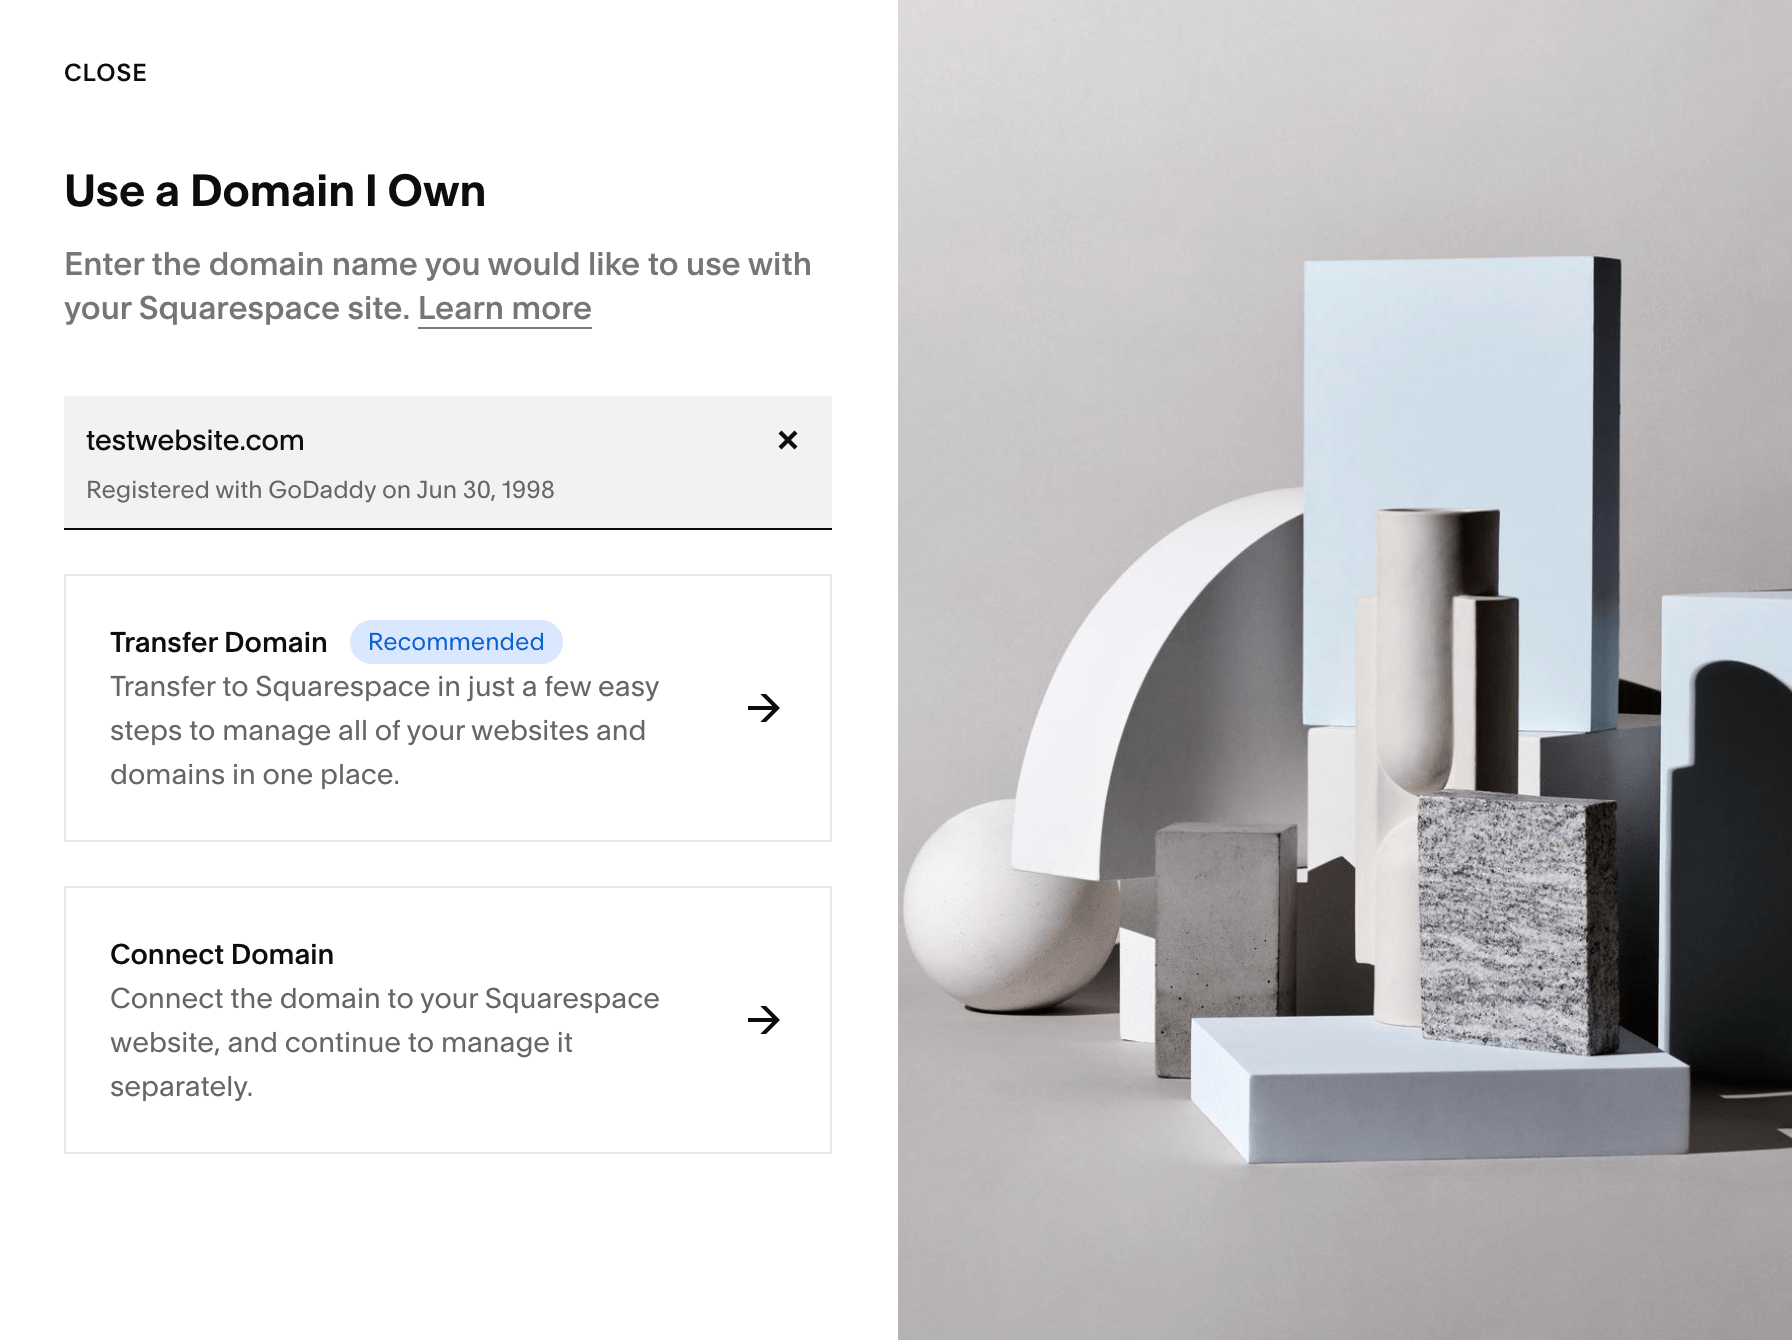
There are advantages and disadvantages for both of these options and the process is going to be slightly different depending on which one you go with, so just follow the guides and instructions provided by Squarespace to make sure everything goes smoothly.
We also have a super in-depth guide for how to connect your domain to Squarespace that goes over the pros & cons and set up for each option, so be sure to check that out if you need some help making a decision.
Keep in mind that your domain can take up to 48 hours to connect, so you’ll want to get this taken care of with plenty of time to spare if you plan to launch on a specific day!
And if, for some reason, you would like to purchase a new domain through Squarespace, all you need to do is head back into the Domains panel and instead click on the Get a Domain button.
You’ll then be taken to a new window where you can search for and purchase your new domain and get things set up from there.
And that’s a wrap on transferring your website from Wordpress to Squarespace! Once you've gone through each of these steps and are confident in your new Squarespace site, you can set your website to public and launch proudly.
Hopefully this guide was helpful and that you now feel confident to make the switch. We promise, you won’t regret it. Welcome to the Squarespace squad!
Want more website tips? Check out the posts below:
Website Pages That Will Increase Your Revenue (and you Should add Today!)
How to Design and Optimize Your Homepage for Better Results
The Ultimate Website Pre-Launch Checklist (Everything to Do Before You Hit Publish)
Different Portfolio Styles to add to Your Squarespace Website
The Best Linktree Alternative: How to Create a Custom Link in Bio Page on Squarespace
