

How to Link to Your Blog Categories on Your Squarespace Website
When you’re running a blog, it can be easy to get caught up in the demand of content. You start writing on a variety of topics and then continue to just churn out post after post to keep your audience happy.
And while it’s great (and highly recommended) to blog consistently, it can be difficult to keep track of all the topics you’ve covered after a while. This is where Squarespace’s blog categories come in super handy!
Using categories is a great way to organize your posts, group them into similar topics, and create a bank of useful info and resources. Category pages can sit within your main blog, showing eager readers directly to the materials they need, or, you could even use a category link on your home page as a ‘neon sign’ pointing readers to the good stuff.
So, to help you make the most out of your blog categories, in this post we’ll discuss:
How to add categories to blog posts in Squarespace
How to link to specific blog categories from anywhere around your site (including navigation links and summary blocks)
How to add a category drop-down menu to your main blog
Let’s dive in!
How to Add Categories to your Squarespace Blog
Adding categories to your blog means that you can separate each new post into its own blog ‘family’. Individual categories will then be stored on category pages that will only display posts that are assigned to that specific category.
This is incredibly useful if readers want to stick to posts around the same topic, and provides a super convenient search facility. It also gives you added control in organizing your blog posts which we know is super helpful if you’re planning on running a large blog!

Before you begin, it’s important to have your blog set up properly and at least one blog post published. And if you aren’t able to publish a fully finished post just yet, you can create a couple of mock posts with different titles and URLs for now. Everything can always be edited later.
PRO TIP: We recommend keeping your category names as simple as possible (ideally just one word) and refraining from adding too many.
Adding Categories to Squarespace 7.1 Blog Posts
Navigate to your Pages Panel and then click into your Blog.
In the Blog Panel hover over one of your published blog posts and click the 3 dots to the right of the post title. Then click Settings.
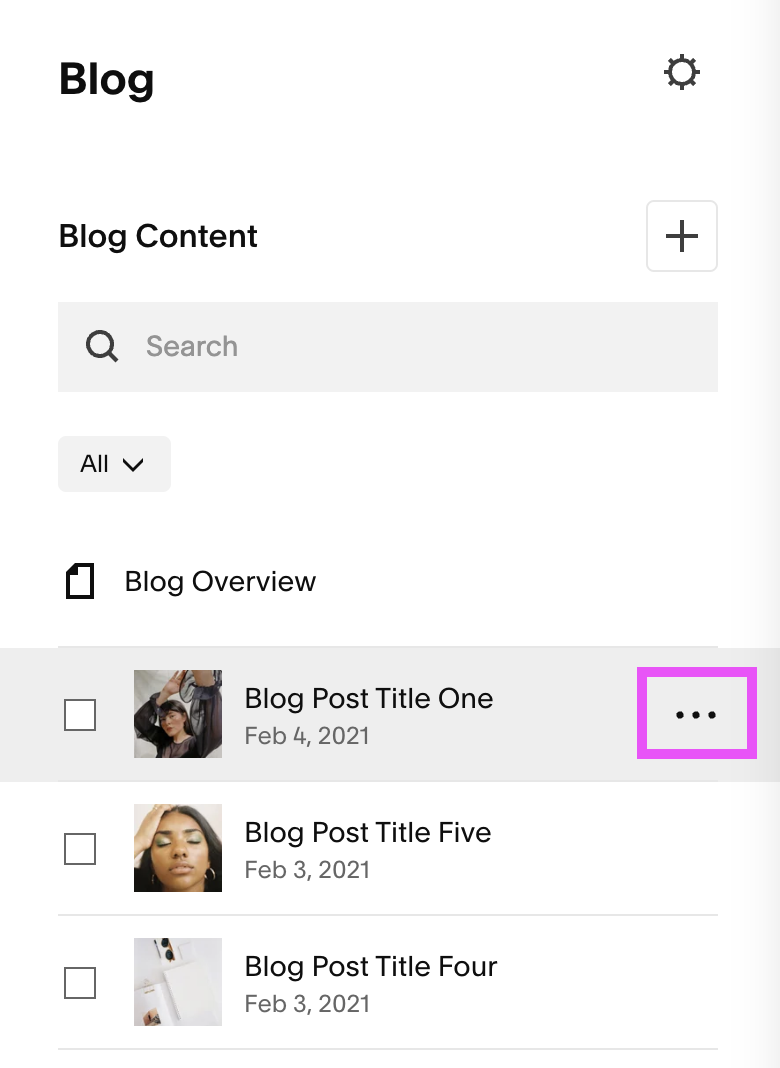
In the Settings window that pops up, navigate to Options and then click into the Categories tab.

You can then choose one of your existing categories, or click where it says “Add categories here”, type your new category name and press enter.

Your new category will then show up in the categories list along with any other previously added categories. You will need to do this for each new blog post that you add!
To delete a category, simply click the box to the right of the category name and then choose Delete at the bottom of your list.

And before you exit, make sure to click Save in the top left corner of the Settings window to lock in all your changes.
Adding Categories to Squarespace 7.0 Blog Posts
Navigate to your Pages Panel and then click into your Blog.
In the Blog Panel hover over one of your published blog posts and click Edit to the right of the post title.
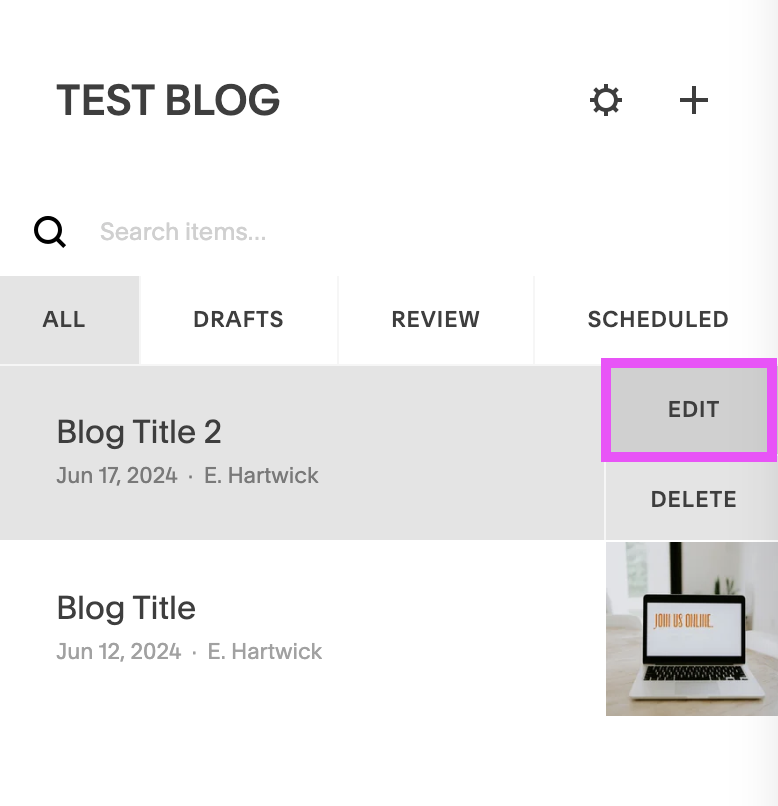
At the very bottom of the Editing window that pops up, click the “+” icon next to Categories.

You can then choose one of your existing categories, or click on Create Category, type in your new category and press enter. You’ll need to do this for each new blog post that you add!

Finally, click Save in the bottom right corner of the Editing window before exiting.
To delete a category, you’ll need to navigate to your Blog Settings by clicking on the cog icon to the right of your Blog name.

In the Blog Settings window that pops up, click on Advanced and then choose the Manage Categories tab.
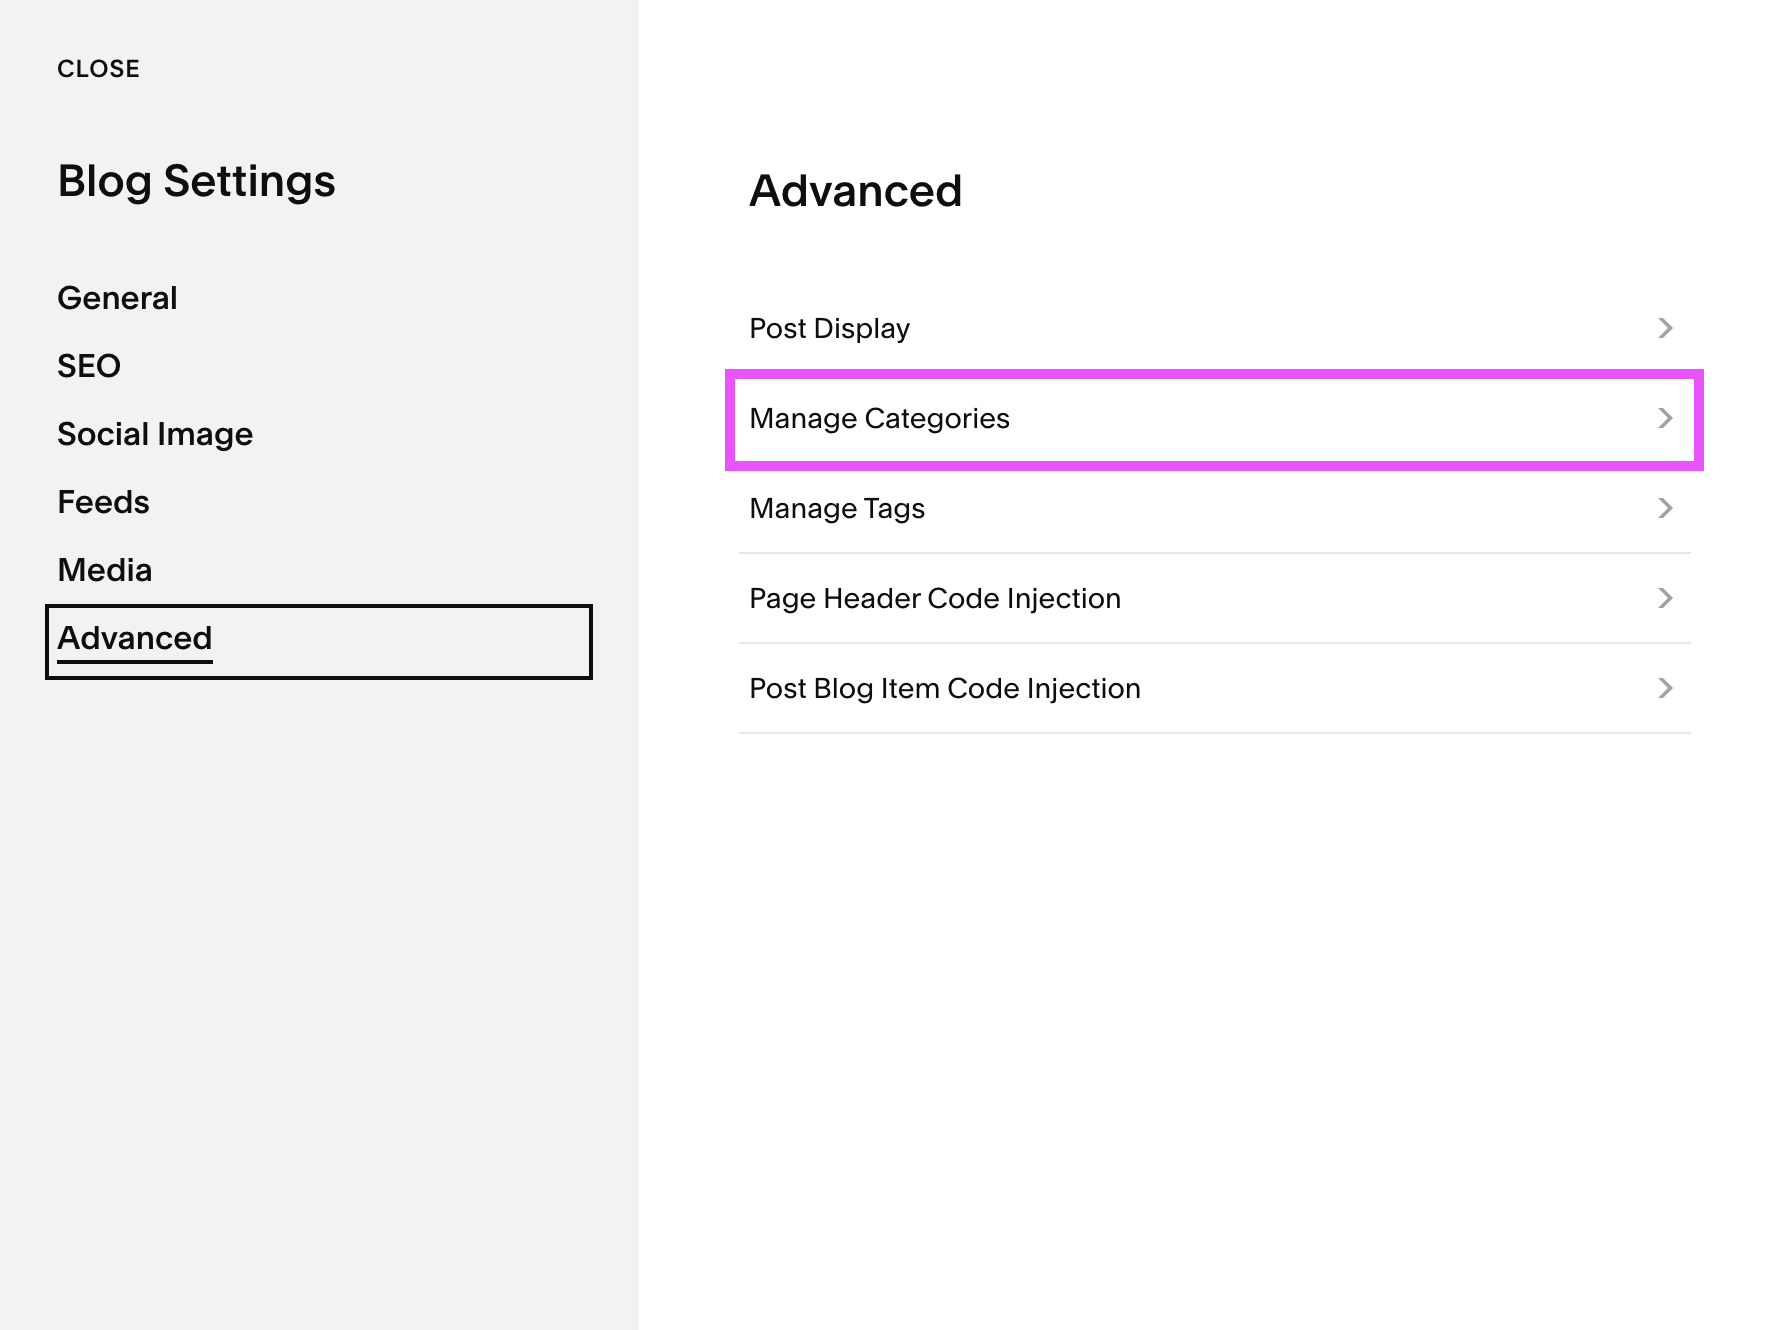
You can then click the box to the right of any category you want to remove and choose Delete at the bottom of the list.

How to Use Categories on your Main Blog Page
Now that you’ve created categories and added them to your published blog posts, let’s talk about how you can utilize the categories feature to make searching for posts super easy for readers!
There are a couple of ways you can go about doing this and both methods will work in Squarespace 7.1 and 7.0.
Linking Categories in the Header of your Main Blog
This option allows you to create simple text links that readers can then click on to navigate to different categories of posts.

Linking your categories in this way is a fast solution that doesn’t require much extra work, and is perfect if you have a smaller blog or only a few categories. To achieve this, first navigate to your main blog page and enter Editing Mode.
Add a Text Block wherever you’d like to create your links (in 7.1 you might need to first add a new Section) and type out your categories.

Next, highlight one of your categories and click the Link icon in the editing bar.

In the Link Dropdown, scroll until you find the Blog Categories section and choose the appropriate category.

You can then click out of the Link window and your text should now be linked directly to the corresponding blog category! Repeat the same steps for each category that you want to link and then click Save in the top left corner of your screen before exiting editing mode.
Creating a Category Dropdown Menu on your Main Blog
This second option is a really cool feature that many people still don’t realize even exists on Squarespace! We use it in multiple places on our own website and throughout our Squarespace Templates and it’s always a really popular tool.

Example from our Nyx Premium Squarespace Template
Adding a category dropdown menu to your blog allows readers to filter by category and is perfect for blogs that have a ton of posts. To add a category dropdown to your blog, first navigate to your main blog page and enter Editing Mode.
Next, add an Archive Block wherever you’d like to place the dropdown.
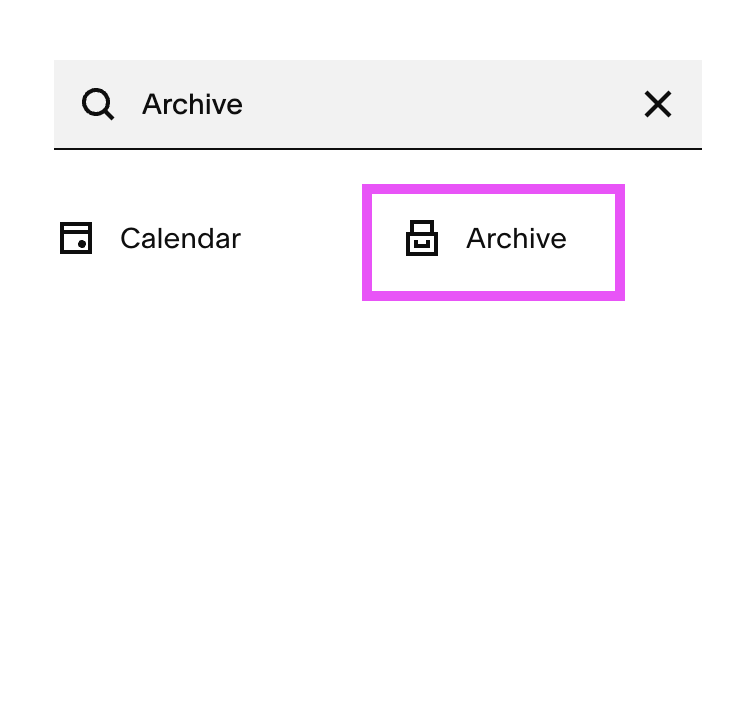
Double click on the block to access its Settings. Then, under the Content tab, make sure to select the blog that you want to pull categories from.

Next, head into the Display tab and under Layout, click the dropdown menu and choose Dropdown.
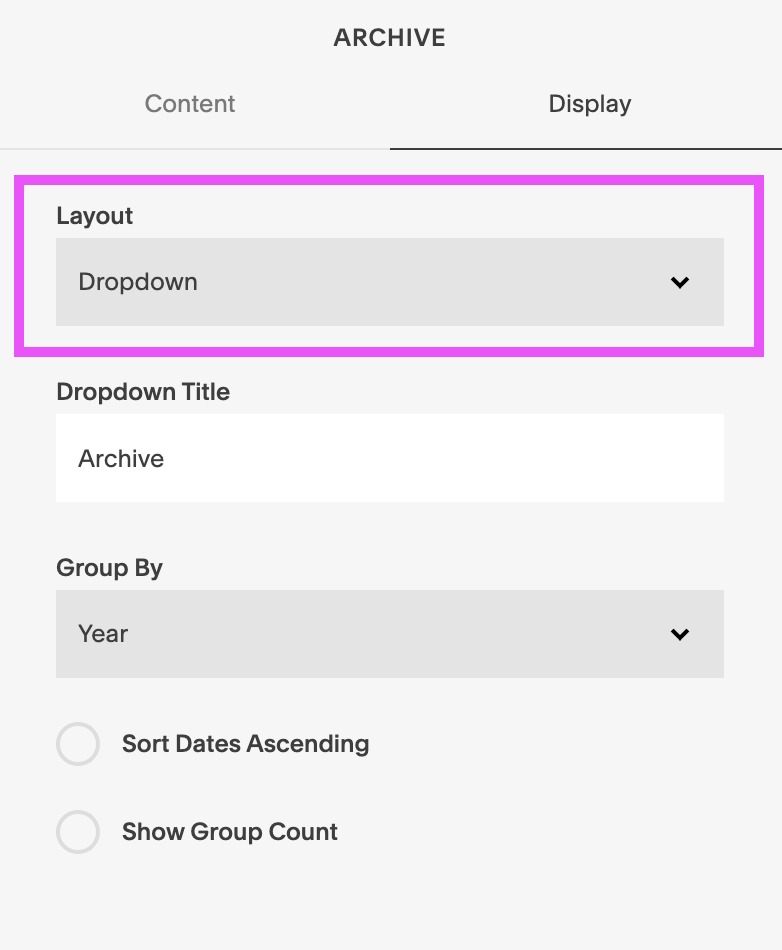
Then, change the Dropdown Title to “Categories” or something else that tells people what they're using the dropdown for.

Finally, under Group By, click the dropdown menu and choose Category. Once you've done all that, you can click out of the Settings pop-up window.

Something to keep in mind is that this Archive Block automatically aligns to the left, and can’t really be changed unless you use custom code. Because of this, we like to add some other type of content next to it to even things out, and a Search Block is perfect for this!
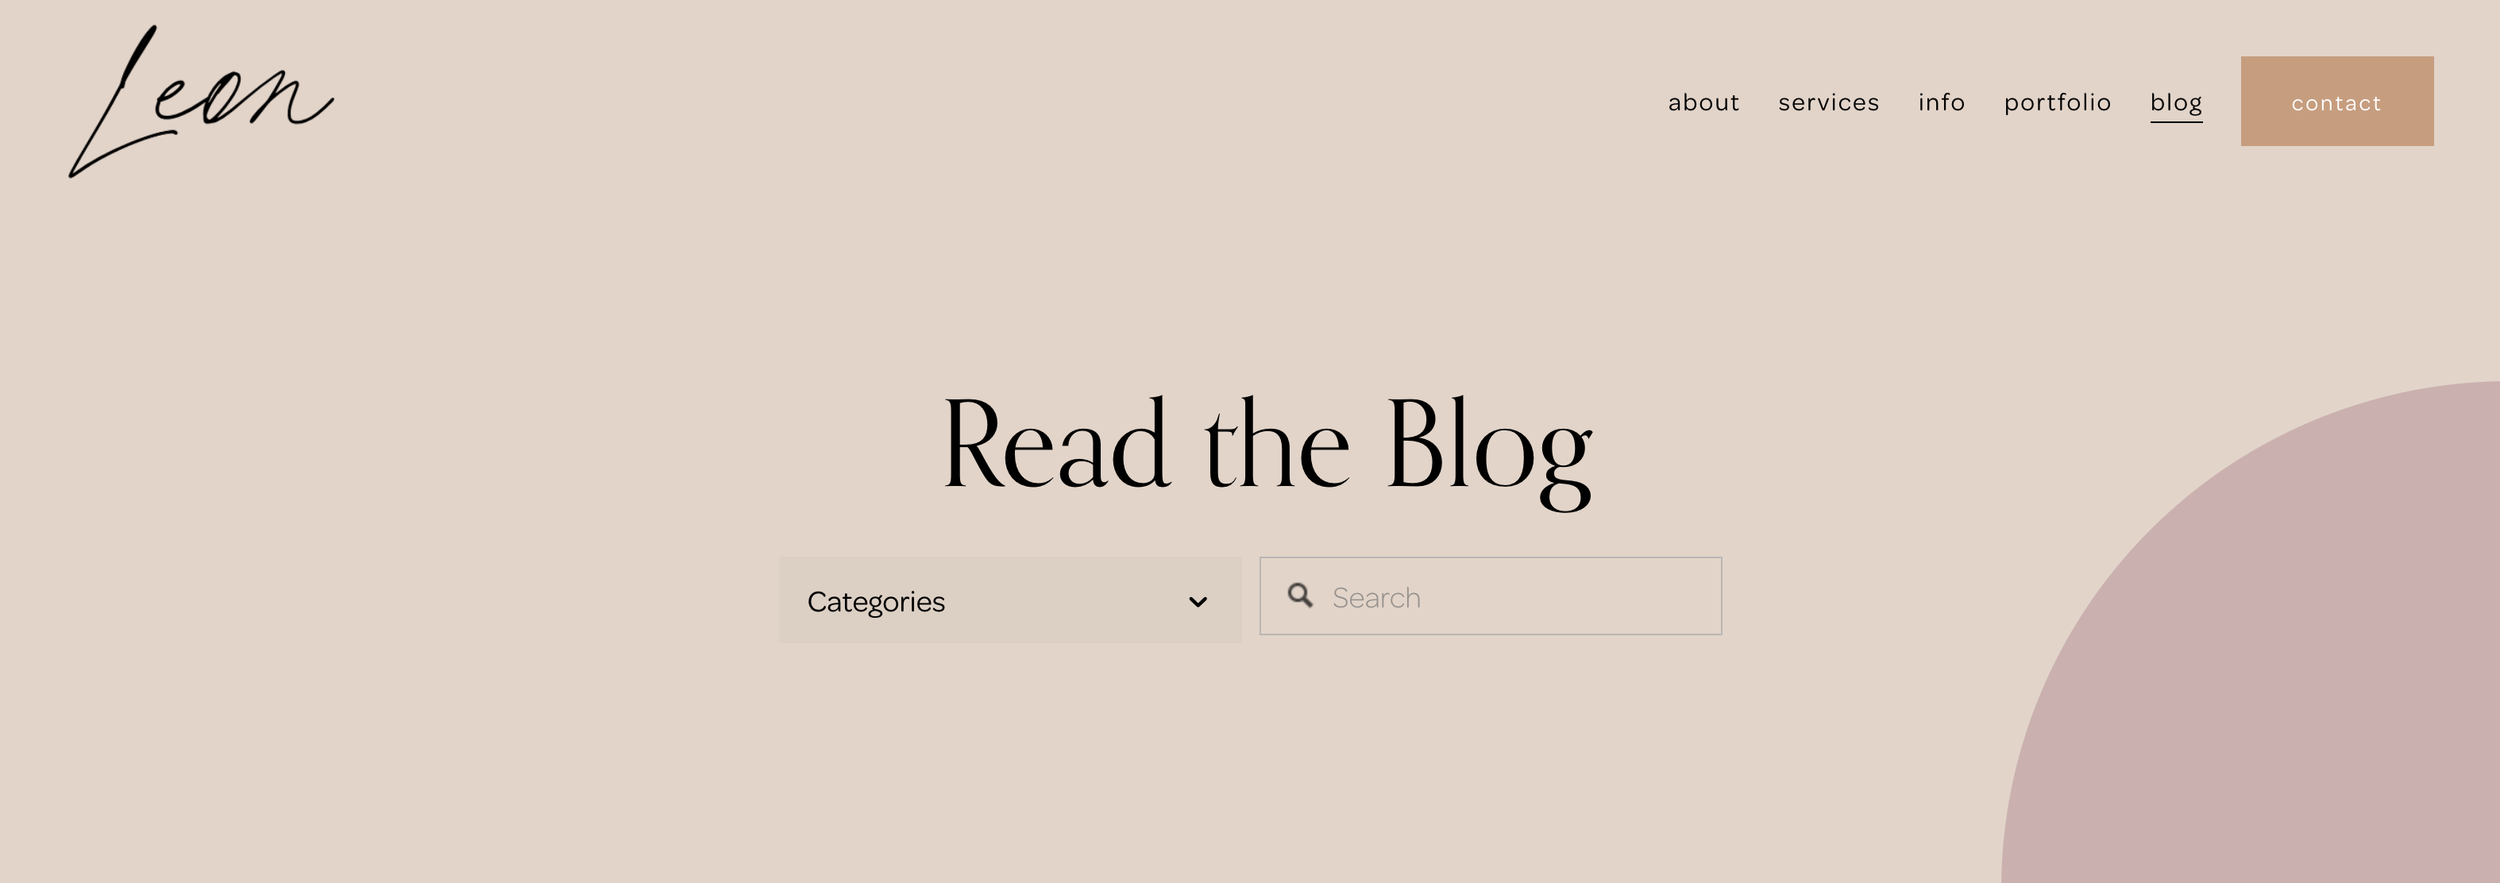
Example from our Leon Squarespace Template
To add a Search Block, simply click Add Block and choose “Search”. Move the block wherever you’d like it placed and now you have an additional feature that allows your readers to search categories or key words to find just what they’re looking for.
How to Link to your Blog Categories Throughout your Squarespace Site
One of the greatest things about Squarespace is that nothing is one dimensional. Nearly every tool and feature has multiple uses and various ways to be presented. This means that you aren’t limited to displaying categories only on your main blog page!
You can also add category links to your main navigation and through Summary Blocks which helps provide more opportunities for readers to find the posts they’re looking for, keeping them on your site longer (yes, please!).
So let’s walk through the different ways you can link to categories throughout your website.
The following methods will work in both Squarespace 7.1 and 7.0.
Add a Single Category Link to your Main Navigation
If you have one blog category that receives more traffic than the rest, you might consider creating a super accessible link in your main navigation so that site visitors can navigate to those posts directly from your menu!
To do this, first navigate to your Pages Panel and then the Main Navigation section.
Next, click the “+” icon to the right of Main Navigation and at the very bottom of the Pages Menu, choose Link.


In the Link Editor pop-up you can give your link a Title (most likely this will be the name of your category). Then, in the URL dropdown menu scroll to the bottom until you find the Blog Categories section and choose the category you want to link.

When you’re happy with your choices, click Save in the top right corner.

You should automatically see your category link added to your main menu ready for readers to click!

Add a Category Dropdown Menu to your Main Navigation
Now, in some cases, you might have multiple categories that perform really well. Or, if you only have a few categories, you might just want to include them all in your main navigation. In this case, you can easily add a dropdown menu to your navigation so that site visitors can choose which category they’d like to navigate to.
To do this, first navigate to your Pages Panel and then the Main Navigation section.
Next, click the “+” icon to the right of Main Navigation and at the very bottom of the Pages Menu, choose Dropdown.


You can then give your dropdown a new name. Something like “Blog” or “Blog Posts” will work well here. Then click Add Page and follow the steps from above to add each of your category links!

PRO TIP: You can also click on any category links that are already in your navigation and drag them under your new dropdown to add them to the folder.
If you want to add an “All Posts” category to the dropdown, simply follow the steps for adding a new link and then instead of choosing from your Blog Categories, just choose your main blog page from the URL dropdown. Then, when someone clicks on “All Posts” it will take them to your main blog with all posts showing.
Once you’ve added all of your categories, your dropdown should automatically show up in your main menu and look something like this:

Filter your Blog Categories Using a Summary Block
The last thing we want to mention for linking your categories are Summary Blocks!
A Summary Block allows you to display content from certain collection pages on your website, aka your blog page. They allow you to highlight specific pieces of content that are especially important or relevant for your visitors, making them a great tool for your home page.

Example from our Verano Squarespace Template
And you can use Summary Blocks to filter your blog categories so that viewers will only see posts that fall under the category you’ve chosen.
To do this, navigate to the area of your website where you want to add the Summary Block and enter Editing Mode. Then, click Add Block and choose Summary from the block menu.

Move the block wherever you’d like in the section and then double click on the block to open up its Settings. In the Content tab, click on Select a Page and choose your main blog.
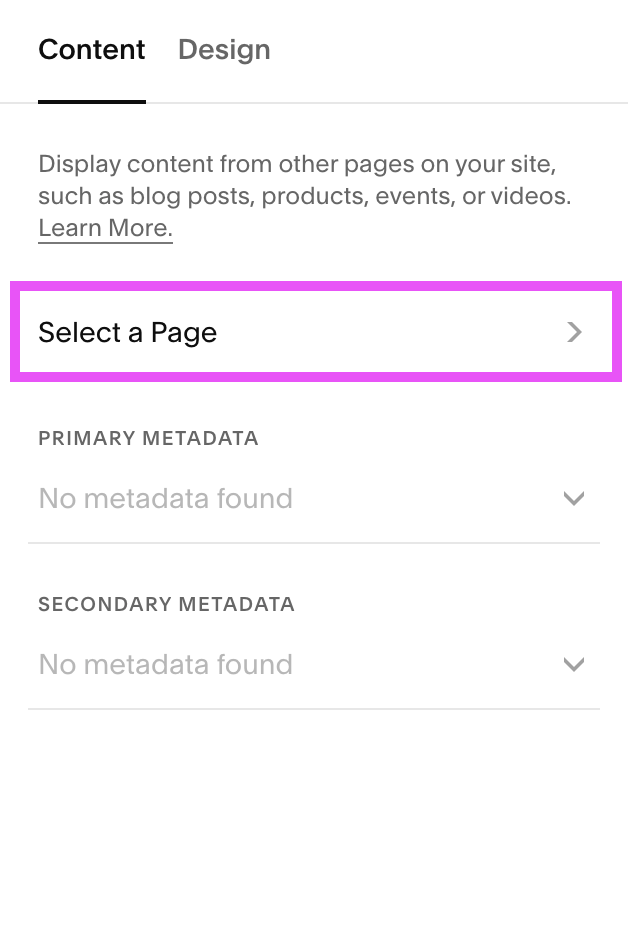
Choose whatever you’d like for Primary and Secondary Metadata and then click on Filter Items.

Under the Category dropdown, you can then choose one specific category to highlight.

After that, head into the Design tab to customize the look of your Summary Block, and when you’re finished, click out of the Settings window.
Click Save in the top left corner of your screen before exiting Editing Mode.
In the end, you should have a highlighted selection of blog posts from one specific category that your visitors can browse through!

And that’s all there is to it!
Ultimately, categories are a really effective way to keep your blog posts tidy and organized. Utilizing them also allows your readers to easily search and find the posts they’re looking for, which makes it easier than ever to navigate your site.
Go ahead and play around with your categories as well as all of the different ways to link them around your site to work out which is most suitable for you and your blog. Once you get the hang of it, you’ll be a categorizing machine!
Want more blog tips? Check out the following posts:
How to Start a Blog with Squarespace
How to create a ‘featured post’ slider in Squarespace 7.1 & 7.0
How to add a blog sidebar to your Squarespace site (7.1 and 7.0)
How to create a blog post template in Squarespace
How & why you should repurpose your blog content
How to add related posts to your blog posts in Squarespace
If you liked this post, Pin it to Pinterest! 👇🏻
