

Different Portfolio Styles to add to Your Squarespace Website
If you run any kind of creative business, having a portfolio on your website is a non-negotiable! It’s where people get to see your work in action, get a feel for your style, and decide whether you’re the right fit for them.
The tricky part? Portfolios can look totally different depending on what you do. A photographer, designer, or artist is going to need a very visual layout, while a copywriter or coach might need more space for text, results, or case studies.
Luckily, Squarespace provides plenty of flexibility to create the ideal portfolio to win over all of your ideal clients. In this post, we'll walk you through a few different ways that you can set up your portfolio right on your Squarespace site.
Let's dive in!
1. Portfolio Page
Possibly one of the best Squarespace 7.1 updates so far has been the addition of portfolio pages.
These work quite similarly to a blog and feature two key components:
an overview page that neatly displays all of your projects and keeps them organized
individual project pages which are fully editable, giving you tons of creative freedom to mix text, images, videos, and sections to display your work in its best light

Portfolio Overview Page

Individual Project Page
PS. Did you know that all of our Squarespace templates come with a built-in portfolio included?!
How to Add a Portfolio Page to your Squarespace Site
We have a whole dedicated post to breaking down exactly how to use the portfolio pages, but let’s dive into the basics:
From your Main Navigation Menu, go to Pages
Press + (plus) to add a new page
Choose Portfolio: this will prompt you to choose a design, choose one, it doesn’t matter which one as we can change this later!


And that’s it, you’ve added a new portfolio page! 👏
Pros and Cons of using a Portfolio Page
Pros:
Purpose-built for portfolios.
The portfolio overview page and individual project pages are totally customizable! Just like any other page around your site, you can add sections, any blocks, and customize them as you like, allowing for total creative freedom.
Cons:
There is a limit of 60 projects per portfolio (but that's plenty!).
There are no categories or tags available in the portfolio which means there is no filtering capability and you can't connect your portfolio to a summary block for example.
You can’t move the project pages anywhere else around the site, or even to a different portfolio.
Only available on Squarespace 7.1. If you are using Squarespace 7.0, you can use one of the methods below.
Overall though, this is the option that we recommend for most portfolios as it is just so flexible, purpose-built, and easy to set up. Because the pages are totally customizable, you can create a really unique portfolio that is right on brand, ultra professional, suited to your unique content, and as simple or complex as you want it to be!
That said, there are a few more options if you prefer something more text-based, or just something a little simpler!
2. Use a Blog as Your Portfolio
Now the Squarespace blog feature is actually quite versatile and can be used for much more than a standard blog! Of course, it's built to be quite text-heavy but you can also add image and video blocks as well.
We love this method for larger portfolios that need more organizing because you can add categories (just like you would in a regular blog). For example, if you were a photographer you could have categories like: Weddings, Portraits, Engagements, etc., making it a great, clean way to display lots of pieces.
We use the "blog as a portfolio" method in our Iris Squarespace Template. As you can see, it doesn’t feel like a “blog” at all but has the artistic, professional, and intriguing vibe that you should get from a portfolio instead.

Iris "blog" Portfolio overview page
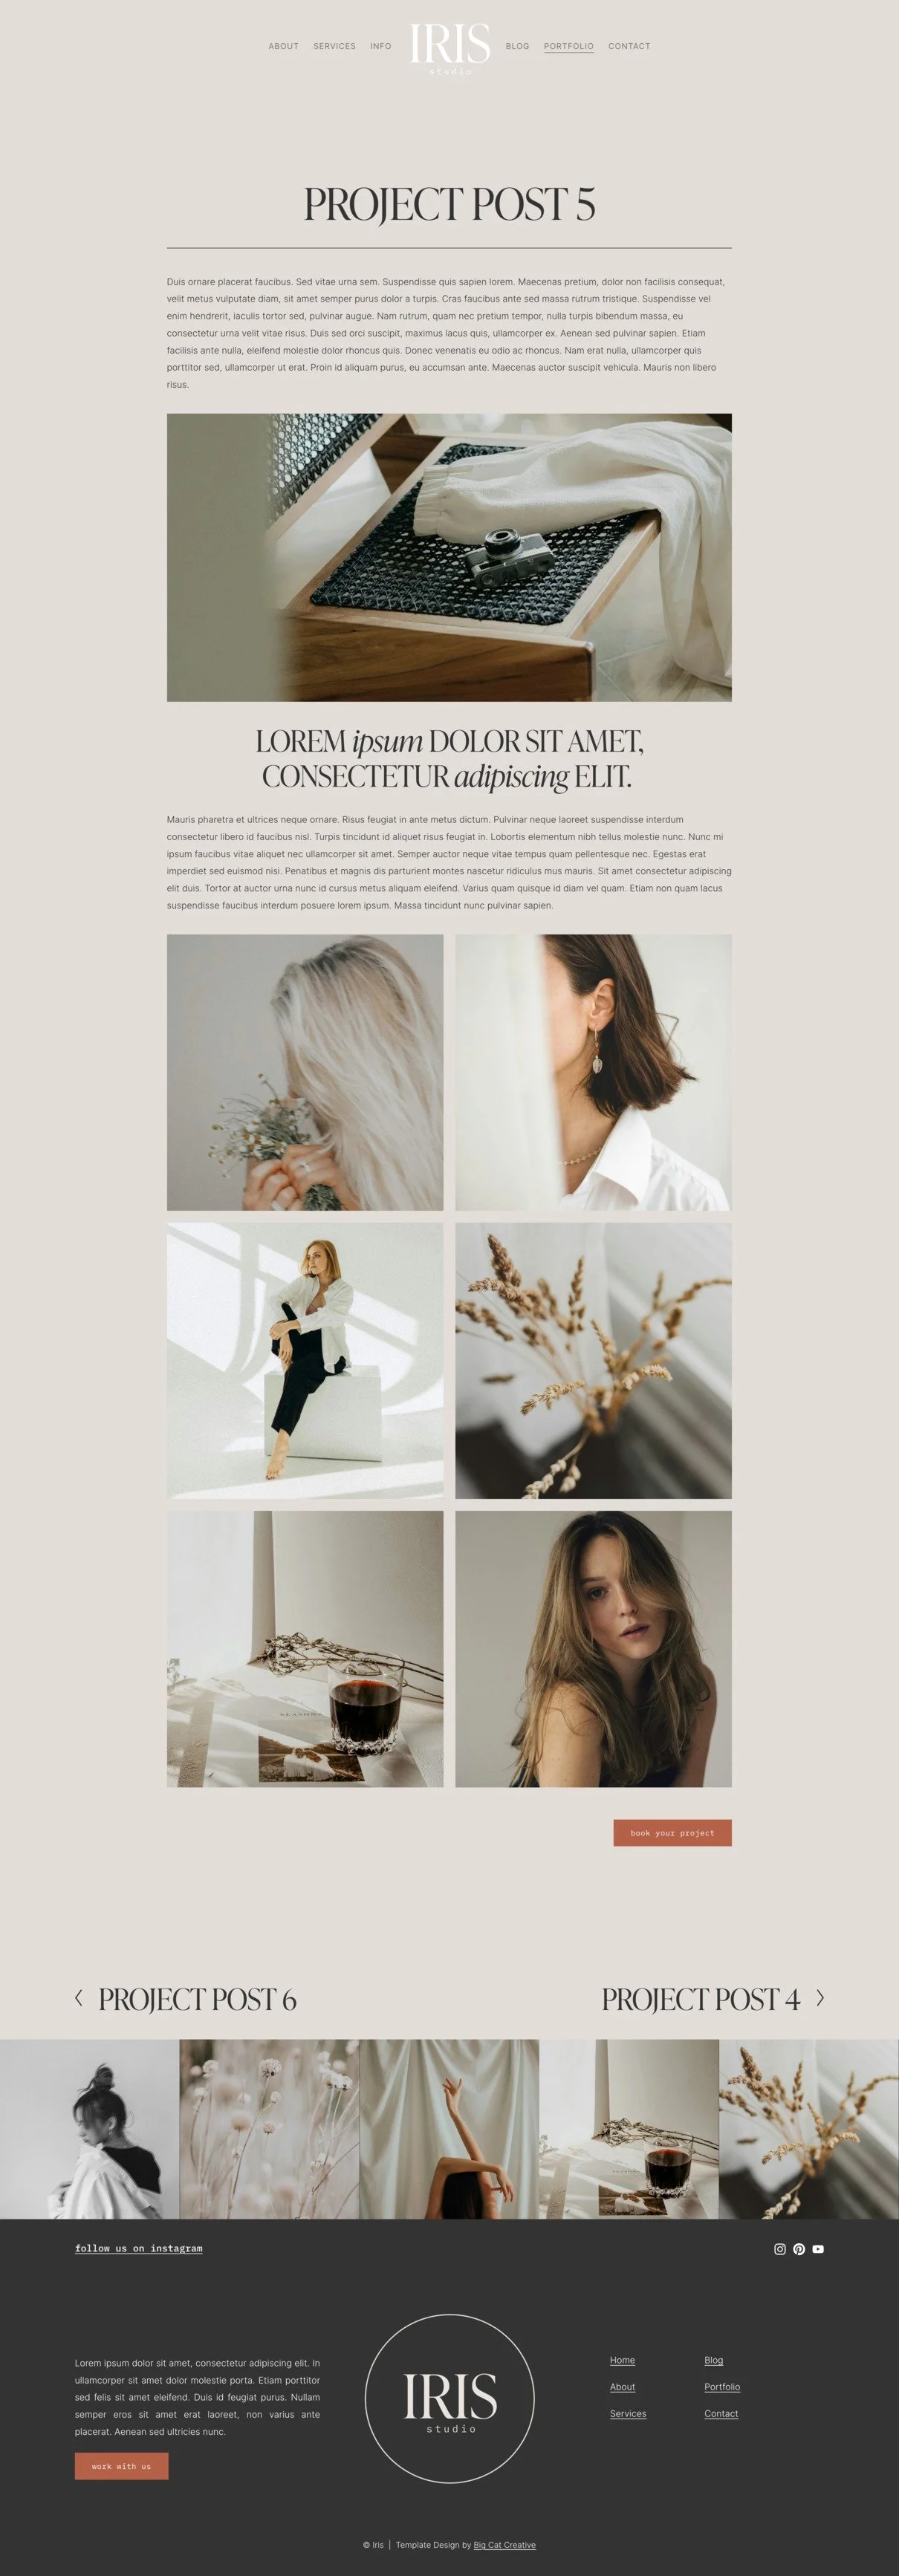
Iris "blog" project
There are two ways you can set up your portfolio using a blog:
Use your existing blog and separate your portfolio with categories.
Create a dedicated second blog just for your portfolio.
Pros and Cons of using a Blog as a Portfolio
Pros:
The ability to have categories makes it easy to filter if you have lots of projects or topics.
The blog overview page is totally customizable and you can add as many Fluid Engine sections and blocks as you like, including a categories dropdown or search bar!
The individual "blog posts" or project pages use the Classic Editor layout which is great for keeping text-heavy content consistent and structured.
Cons:
The individual "blog posts" or projects pages use the Classic Editor layout which is a lot more limited for customization. They are made up of only one "section," meaning that you can only have one background color throughout the whole post.
Less creative freedom overall and can feel less "designy".
👉 Read more about the differences between Fluid Engine and Classic Editor here
Overall, using a blog as your portfolio is ideal if you need structure and organization in your portfolio. While the individual project pages are less flexible design-wise, the ability to add categories is a big win!
3. Use a Dropdown Menu and Individual Pages
If you don't have many portfolio projects just yet or only want to feature a select few, then this is probably the easiest method for you!
Step 1: Add a Dropdown Menu to your Main Navigation
Head over to your Pages panel and click on the + icon next to Main Navigation.
In the pop-up menu, scroll all the way down and select Dropdown.

Name your dropdown something like "Portfolio"

Then, you can click on + add page below the dropdown to add a page directly inside the dropdown folder. You can also drag and drop any page in your Pages panel directly into the dropdown folder to add it in.

You can add as many pages as you want into this folder, and they can be any type of page: a regular page, a video page, a link, etc. You can really get creative!

Step 2: Customize the Project Pages
From there, you can freely customize the project pages you've added, especially if you've just added a regular blank page! Edit it as you usually would by adding as many sections and blocks as you like.
Pros and Cons of Using a Dropdown with Individual Pages
Pros:
Total creative freedom.
You can add as many pages and different page types as you like, making this a very flexible method that can suit any kind of portfolio
You can link to external pages directly from the dropdown which is pretty handy if you have portfolio pieces on other sites.
Great for smaller portfolios or to feature a select few projects.
Cons:
Gets heavy and cluttered if you have lots of projects or long titles.
Not as scalable as using blog or portfolio pages.
Overall, this is a great method to feature a few projects right from your site's main navigation, making it super easy for potential clients to access and view some of your top projects. It's not so great if you have lots of projects that you want to feature as your main navigation will quickly start looking cluttered.
4. Gallery Sections
Really more of a tip than a method itself, gallery sections are the perfect way to display lots of images in a beautiful and functional way! You can add gallery sections to any regular page, portfolio page, or individual project page. They have lots of different settings and layouts available to showcase your images in creative ways and allow you to upload images in bulk which can be a massive timesaver if you have tons to add to your site at once (looking at you photographers!).
If you are a Squarespace Circle Member, you'll additionally have the option to add gallery blocks which work in a very similar way but can be added anywhere on a page (rather than being specifically their own section).
How to add a Gallery Section to your Squarespace Site
Navigate to the page that you would like to add the gallery section to and click Edit in the top left.
Hover on the page and click Add Section
In the pop up, scroll down to the Images tab in the left sidebar.
Any layout with an 'i' in the top right corner indicates that it is a gallery section (and don't worry you'll be able to customize the layout more later!).

Pros and Cons of Gallery Sections
Pros:
Super visual, minimal setup.
Perfect for photographers, artists, or product showcases.
Can upload images in bulk.
Tons of built-in layouts (grids, slideshows, carousels).
Can be combined with other sections on a page to create a unique and detailed portfolio project.
Cons:
No text or detailed project descriptions within the gallery section itself.
Very simple stand-alone, you will probably want to combine it with one of the methods listed above.
Gallery sections are a quick way to showcase lots of images and are a must for image-heavy portfolios. While they don’t allow for much text or detail on their own, pairing them with another portfolio method makes them a powerful (and time-saving) addition to your site!
Which Portfolio Option Should you Choose?
The best portfolio setup really comes down to what kind of work you do and how you want people to browse through it:
Portfolio Pages (7.1) → The go-to option for most people. They’re purpose-built for portfolios, super customizable, and look professional right away.
Blog as Portfolio → Awesome if you’ve got a bigger or more text-heavy portfolio and want to organize things with categories.
Dropdown Menu + Individual Pages → Perfect if you only have a handful of projects you want to feature. It keeps things simple and puts your top work front and center in your main menu.
Gallery Sections → A lifesaver if your work is very visual. They’re quick to set up, let you upload in bulk, and showcase your images beautifully. Pair them with another method if you want to add more context.
At the end of the day, the “best” portfolio setup is the one that makes your work shine and feels easy for you to keep updated. Remember, your portfolio doesn’t have to be perfect from the start. Pick the setup that works best for you right now, start showcasing your projects, and refine it as your business grows. The sooner you share your work, the sooner it can start winning you the clients you really want!
Want a ready-built portfolio template ready to go? All of our Squarespace templates come with a portfolio built-in so you don’t have to start from scratch!
👉 The Best Portfolio Squarespace Templates to Showcase Your Work
If you liked this post, Pin it to Pinterest! 👇🏻
