How to Create a Youtube Preview for Instagram Stories in Canva
So, you've posted a video on YouTube, and you want to add a preview of it to your Instagram Story? It's what all the pros do...
Luckily, I've put together an extremely easy, step by step on how you can do this with JUST Canva, your video file, and some software you already have on your computer.
Trust me, it's REALLY easy and quick.
I wanted to do this for a recent video, and like a good DIYer, I Googled to see if there was a quick and easy way to do it. I found a variety of free and paid programs that can automatically do it for you, some tutorials involving these programs, and a few ways involving advanced video editing software.
Then I realized, I can just do it myself in Canva!
This method is not only super easy and fast, but it's also great because you can use your video file instead of having to use a link to a video that's already uploaded to YouTube (like other methods use). This is great for us as we love to batch our content well in advance!
All you need is:
Your video file
A Canva account (free is fine!)
Quicktime (for Mac) or Photos (for Windows) - these both come standard with your Mac or Windows! You don't need to download anything.

Step 1: Trim the Video
How Long Should it be?
We'll need to create a clip that's 15 seconds long since we're making it for IG stories which are 15 seconds.
But if you are making this for IGTV or want it to spread over multiple stories, you can totally make it longer!
How you decide to trim the video, and how long you make it, is really personal preference.
I trim my videos in the most simple way possible. 15 seconds from the beginning of the video. This is probably the easiest and fastest way to create a 15-second preview.
But depending on timing and preference, you could clip out different parts and stitch together the main points and make a more comprehensive preview. It's up to you! This will no doubt take longer to create.
Decide how you want the length and format to be, and once you've figured that out, we can move on to actually editing the video.
How do I Actually Trim the Video?
There's an option for everyone here, from simple to more advanced methods.
The following two options (Quicktime for Mac and Photos for Windows) are really only best for very simple trimming:
Within Canva’s Video Editor:
Canva has recently launched it’s very own built-in Video Editor! So no need for any fancy video editing software. Drag and drop your video straight into Canva to upload it, and then use the video editing and trimming tools to cut a preview from your original video. Click here for more information on how to use the Canva Video Editor.
You have a Mac and the Quicktime app:
Quicktime makes it really easy to simply trim down your video - this is what I use. If you have a Mac, you will have Quicktime too.
Duplicate your video file so you are working from a copy (we don't want to trim the original!)
Open it in Quicktime
At any point in the video, you can pause and click EDIT > SPLIT CLIP.
This splitting function can be done anywhere as many times as you want.
Then once it's split, you can delete the different sections (click on the section, click delete on your keyboard).
For my simple 15 second clips, I set the slider on 15 seconds > EDIT > SPLIT CLIP > Click and delete the long clip, which leaves just the 15-second clip.
Save as a new file!
If you want video instructions on this, make sure to watch the Youtube video linked above!
You have a Windows:
You can easily trim videos in Windows with the Photos app!
Duplicate your video file so you are working from a copy (we don't want to trim the original!)
Open your video in the Photos app
Click the EDIT Icon
Click TRIM
Then you can use the slider to trim your video
Save as a new file!
If you want a more advanced preview video that has different clips and editing:
Use video editing software:
If you are the one who edits your videos already, you probably already have video editing software that you're comfortable using. Use this to trim and edit your preview video!
Use your video editor:
If you're not editing your own videos, then you probably have a video editor (as in, a person who edits your videos for you!). Get your video editor to create a trimmed version for you at the same time as your videos - this is a quick and simple task for them and shouldn't cost you much extra (though, this depends on how advanced you want the preview!).
Step 2: Create the YouTube Preview Graphic in Canva
This step is too easy to be true.
Create the Design
Start a new design in Canva and choose Instagram Story for the size
You can choose from their IG Story Templates or just create your own design! There are a few cool templates in there for IG Story Video previews for Pro Users, though, so check them out! Otherwise, just use their free elements to build yourself something custom.
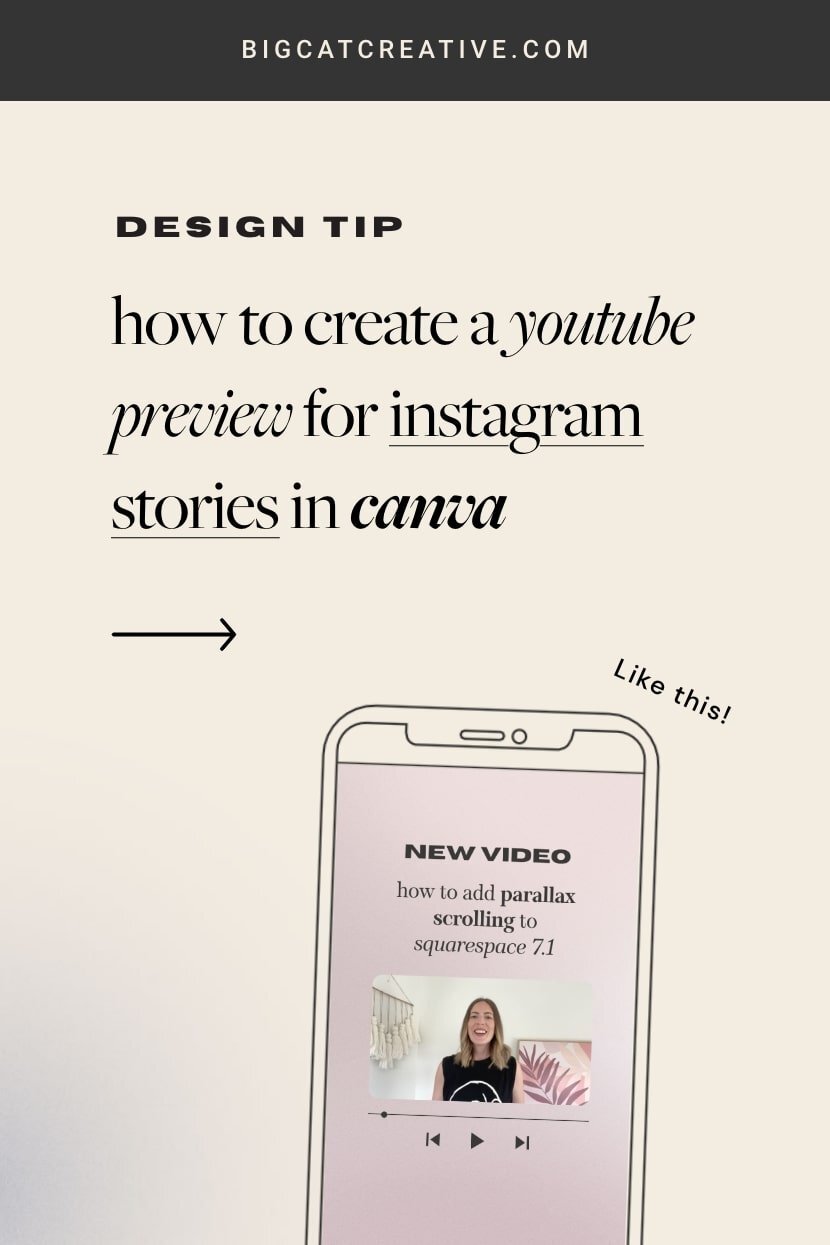
I like to include the video title somewhere, and also some space so I can add a Link Sticker directly on Instagram!
Upload Your Video Preview
Click on UPLOADS in the sidebar
Then drag your video preview files from your computer into the uploads sidebar
You'll see then uploading under the VIDEOs tab
Add the Video to Your Design
Once your video is upload, click on it and it will instantly appear in your design
If you are using a template or have a frame set up for the video, instead of just clicking on it, you'll want to click and drag it from the sidebar to the frame
From here you can move and adjust it any way you like to sit perfectly in your graphic!
Lookin' good, right? And SO easy!
Bonus: Add Some Background Music
Click on ELEMENTS in the sidebar
Scroll down to Audio
If you are a Canva Pro user, you'll get access to a huge library of free music you can use in your designs. If you're a Canva Free user, there will be a more limited selection.
You can also upload your own audio music, and it will be under UPLOADS > Audio.
Once you add Audio to your design, make sure to adjust the volume to make sure it's quieter than your video, so you can still hear your voice clearly.
Step 3: Upload it to Your Instagram Stories
Download the Preview Graphic
Download your preview graphic from Canva by clicking Download (top right)
Choose MP4 Video
If you have multiple preview pages in Canva, download them separately by selecting the different pages in the download panel. Otherwise, they will all download as one long video.
Send the downloaded file to your phone
Upload the Preview to Instagram
Once the file is on your phone, you can post it whenever you like! It's ready to go.
Log into Instagram and start a new story
Click on the open file tab and add your new Youtube Preview story
Make sure to add a link to the YouTube video using the Instagram Link Sticker!
That's it! Easy, right? If you want more detailed instructions, make sure to watch the video above. And tag us in your video previews @bigcatcreative 😄
If you liked this post, Pin it to Pinterest! 👇🏻