

How to create a gold foil texture in Photoshop
Hey there DIY designers!
Today I’m going to show you how to make a Gold Foil Texture in Photoshop. It’s really, really easy. You can make any color foil texture from this too, but it’s easy to just start with Gold as a base.
Metallic Foil Textures are so handy to have on hand in your resources. I would say that the majority of brands and websites I design for clients have some sort of metallic element somewhere, they're very popular at the moment! So, knowing how to create your own can save you a lot of time looking for the *perfect* texture, and also save you a lot of money downloading bundles.
This tutorial is really a sort of an “adjust until you’re happy with how it looks” process. I give you the basic elements of how I create it, but there’s so many variations that you can play with, and I encourage you to do so.
So let’s get started!
STEP 1
Create document in photoshop any size you want, for this tutorial I made mine 3000x3000 pixels, because I wanted it to be big. But it really depends on what you’re using it for. Larger is good, because you can always cut it down.
STEP 2
Choose two variations of the color you want, a light version and a dark version. Because we’re doing Gold today, these are the colors I chose for Light Gold and Dark Gold. Make these your foreground and background colors.

STEP 3
Then, with our colors chosen, click Filter > Render > Clouds


STEP 4
Then click Filter > Noise > Add Noise and adjust the noise to wherever you like. I have mine quite low.


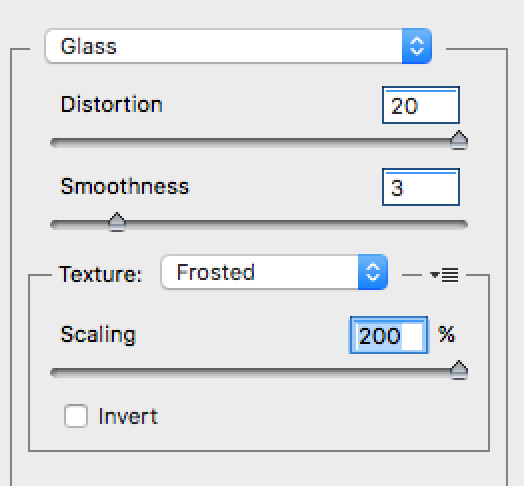
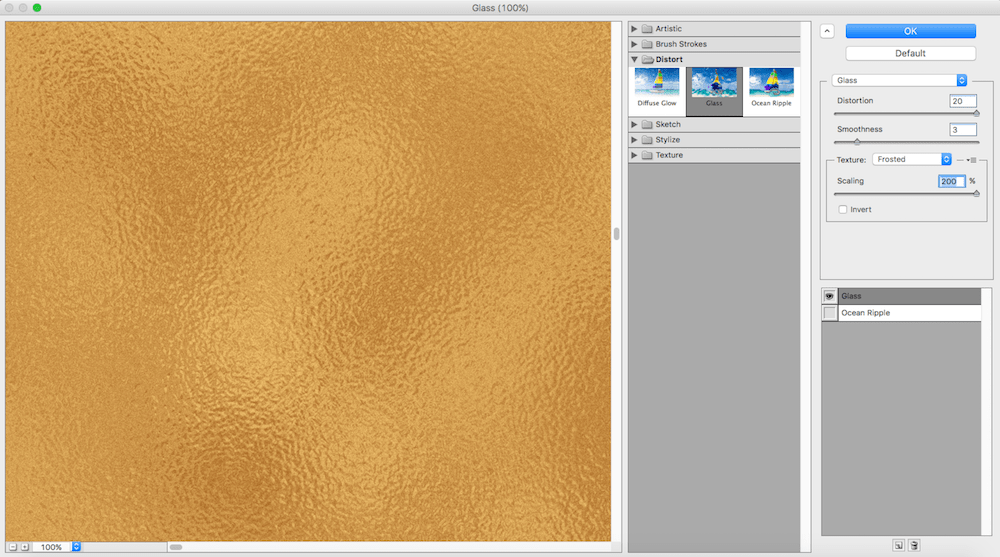
STEP 5
Then click Filter > Filter Gallery and select Glass (under distort)


STEP 6
And then play around with these sliders to see what you prefer.
STEP 7
Now I usually adjust the Brightness/Contrast, the Curves and the Hue/Saturation settings to make it just right. This process is different every time depending on what color I’m doing, so I just play around with them until I’m happy. You can find all of these settings in the Adjustments panel (Window > Adjustments)


You’re done!
How easy was that? You now have an awesome Gold Foil Texture to add to your resource library. Here's a closeup of mine:

Some extra tips...
If you want to use the same file but change it to a different metallic color, go back to the Adjustment panel and adjust the Hue in the Hue/Saturation panel. See how when you move the slider the color changes. Pick a Hue that is as close as possible to the color you want to change to, then go back and play with all of the other Adjustments to make it just right. I’ve found that you often can’t just use the Hue slider to change the color successfully, you need to go back and tweak the other Adjustment settings, and then you can achieve a huge variety of metallics!
Remember to save one “working” file (.PSD) so you can come back and edit it later if you want to make more colors. And save each color you create as a separate high res PNG or JPG.
Here’s some Gold text I created with my new texture!
Want to know how I did it? Check out my article How to Create Rose Gold Text in Illustrator

Thanks for reading! I'd love to see what you create, let me know in the comments below what colors you made!
Erica x